Showing posts with label Michelle. Show all posts

Monday, July 25, 2011

What a Great Weekend...

I have been wanting for at least the past 3 year to take a bread baking class at King Arthur Flour. This past weekend I am happy to say that my dream has come true. I was lucky enough to take the Beauty and the Baguette class. One that I need to take because every time I have made baguettes in the past they have always come out flat.

The back of the classroom where we learned all about how to make french baguettes.


My dough divided into 2 a waiting to be shaped into baguettes.


Some coming out of the oven all nicely baked...boy did it smell amazing in there!


My two baguettes cooling off after coming out of the oven.


I know I want to go back and take another class...is next week too soon. Just kidding I am sure they are all sold out and I know a bunch of people that will hurt me if I go back without them this time.

Saturday, January 29, 2011

Jalapeno Popper Dip...Super Yum!

You know me and always looking for new recipes online. I came across one that just sounds too good not to make. Also since we were having people over for Jacob's birthday it was the perfect time to test it out...and I knew they would love it.

I don't have a picture of the dip but click on the link below and the original blog has a great picture.

Jalapeno Popper Dip
Jamie from: My Baking Addiction

Ingredients
2 (8 ounce) packages cream cheese, softened
1 cup mayonnaise
1 (4 ounce) can chopped green chilies, drained
4 ounces canned diced jalapeno peppers, drained
1/2 cup shredded Mexican style cheese
1/2 cup shredded mozzarella cheese

1 cup Panko bread crumbs
1/2 cup freshly grated parmesan cheese

Method
1. Preheat oven to 350 degrees and spray an oven safe serving dish with non-stick cooking spray.
2. Using an electric mixer, blend the cream cheese and mayonnaise until smooth.
3. Stir in green chilies, jalapeno peppers, and Mexican and mozzarella cheeses. Spoon this mixture into the prepared baking dish.
4. Mix together the Panko and parmesan cheese and sprinkle it over the cream cheese mixture.
5. Spray the Panko and parmesan with a quick spray of non-stick cooking spray.
6. Bake for 25-30 minutes or until the mixture is hot and the topping is lightly browned.

Notes: If you are in a hurry, skip the Panko/Parmesan topping and simply microwave the cream cheese mixture until hot and bubbly.

Serve this dip with, French bread, fresh vegetables, tortilla chips, crackers…pretty much anything that pairs well with cheese!

Review: This one is a keeper for sure and has room for you to customize to your taste. I liked it because it has the popper taste but not super spicy. I know my brother-in-law makes his poppers with bacon so I think I might try to add some bacon bits to it the next time...maybe just on top first try and then if it is good mixed into it the dip. If you are looking for a crowd pleasing dip for next week this one is it!


Friday, January 28, 2011

Happy Birthday Jacob!

Today is my baby's birthday and he is 5...where did the time go? WOW I just can't believe that he is 5 today. I am having a hard time with this because next thing I know he is going to off to college.

So today he is bringing cupcakes in to celebrate his birthday with his friends at school. I asked him what kind he wanted me to make and he said...chocolate cake...and he wanted it to be a Batman cupcake.


The cake recipe (
Devil's Food) and frosting recipe (Easy Vanilla Frosting) was easy to figure out but the decorating now that is a little bit trickier. Mostly because I waited to the last minute to figure out how to do this. Also we don't have a good party store in the area so I couldn't find any Batman party supplies.

It got me thinking of how I could make a batman symbol and this was the best I could come up with. First I found a stencil online and shrunk it down to cupcake size.


Then I traced it a bunch of times onto wax paper so I could get enough for the whole class.


Flipped the paper over and filled it with melted dark chocolate and waited for it to cool and harden.


I then colored the frosting yellow and put one symbol on each cupcake....I sort of want to put a chocolate outline on it but I am going to resist the urge because sometimes less is more and I don't want to mess up a good thing.


I think they came out great and I hope all the kids enjoy them!

HAPPY BIRTHDAY JACOB!!

Friday, December 24, 2010

Hot Chocolate on a Stick

It is that time of year again when I need to get the teachers a little something for all their hard work during the year. I like to give them something from the store and add a little something homemade as well. I found the perfect thing on another blog (Make & Takes) this year that went with the mug/hot chocolate set I bought...Hot Chocolate on a Stick.


First you need to make a recipe from King Arthur Flour that has been featured in their catalog for some time now...Cocoa Blocks.

The person at Make & Takes used Alton Brown's marshmallow recipe but I thought I would make the recipe I saw last year from King Arthur Flour instead.


Homemade Marshmallow

www.kingarthurflour.com

3 packages (1/4-ounce each) unflavored gelatin
1 cup (8 ounces) cool water, divided
1 1/2 cups (10 1/2 ounces) granulated sugar
1 cup (11 ounces) light corn syrup
1/8 teaspoon salt
1 tablespoon (1/2 ounce) vanilla extract
crushed peppermint candies, peppermint oil, or espresso powder, all optional
confectioners' sugar, to sprinkle on top

Combine the gelatin and 1/2 cup cool water in the bowl of an electric mixer fitted with the whisk attachment. Combine the sugar, corn syrup, salt, and 1/2 cup cool water in a small, deep saucepan. Cook the mixture over medium heat, stirring, until the sugar dissolves. Raise the heat to high and cook, without stirring, until the syrup reaches 240°F on a candy thermometer. Remove from the heat.


With mixer on low speed, slowly pour the sugar syrup into the softened gelatin. Increase the speed to high, and whip until the mixture is very thick and fluffy, and has cooled to lukewarm, 8 to 10 minutes. (It should be cool enough that you can spread it into the pan without burning your fingers.)

Add vanilla towards the end of the mixing time. This is also the time to add a few drops of peppermint oil, if desired, instead of vanilla extract. Or try 1/2 teaspoon espresso powder for a coffee-flavored treat. To use the crushed peppermint candies, which will tint the marshmallow pink and add flavor, stir the candies into the marshmallow mixture, leaving some swirls of plain white.

Spread the marshmallow mixture into a greased 9" x 13" pan (glass or ceramic is best). Use your wet hands to smooth and flatten the marshmallows. Sprinkle confectioners' sugar over the top, and let sit for several hours (or overnight) before cutting. Use a greased knife or cookie cutters to make squares or other shapes. Yield: about 100 1" squares.


Review: Both recipes where not hard to make at all. I found that cocoa blocks to be like making fudge which I guess you can say is fudge in a way. Making homemade marshmallow is something I have always wanted to do again and I think the recipe was much better then the last one I tried out a while ago. Next time I might try a different flavor then vanilla to make it interesting. I did make hot chocolate like suggested on the blog with heating up some milk (6oz) and swirling the stick into it. One of the best Hot Chocolates I have ever had...which makes this a keeper for sure!


Happy Holidays!

Tuesday, December 21, 2010

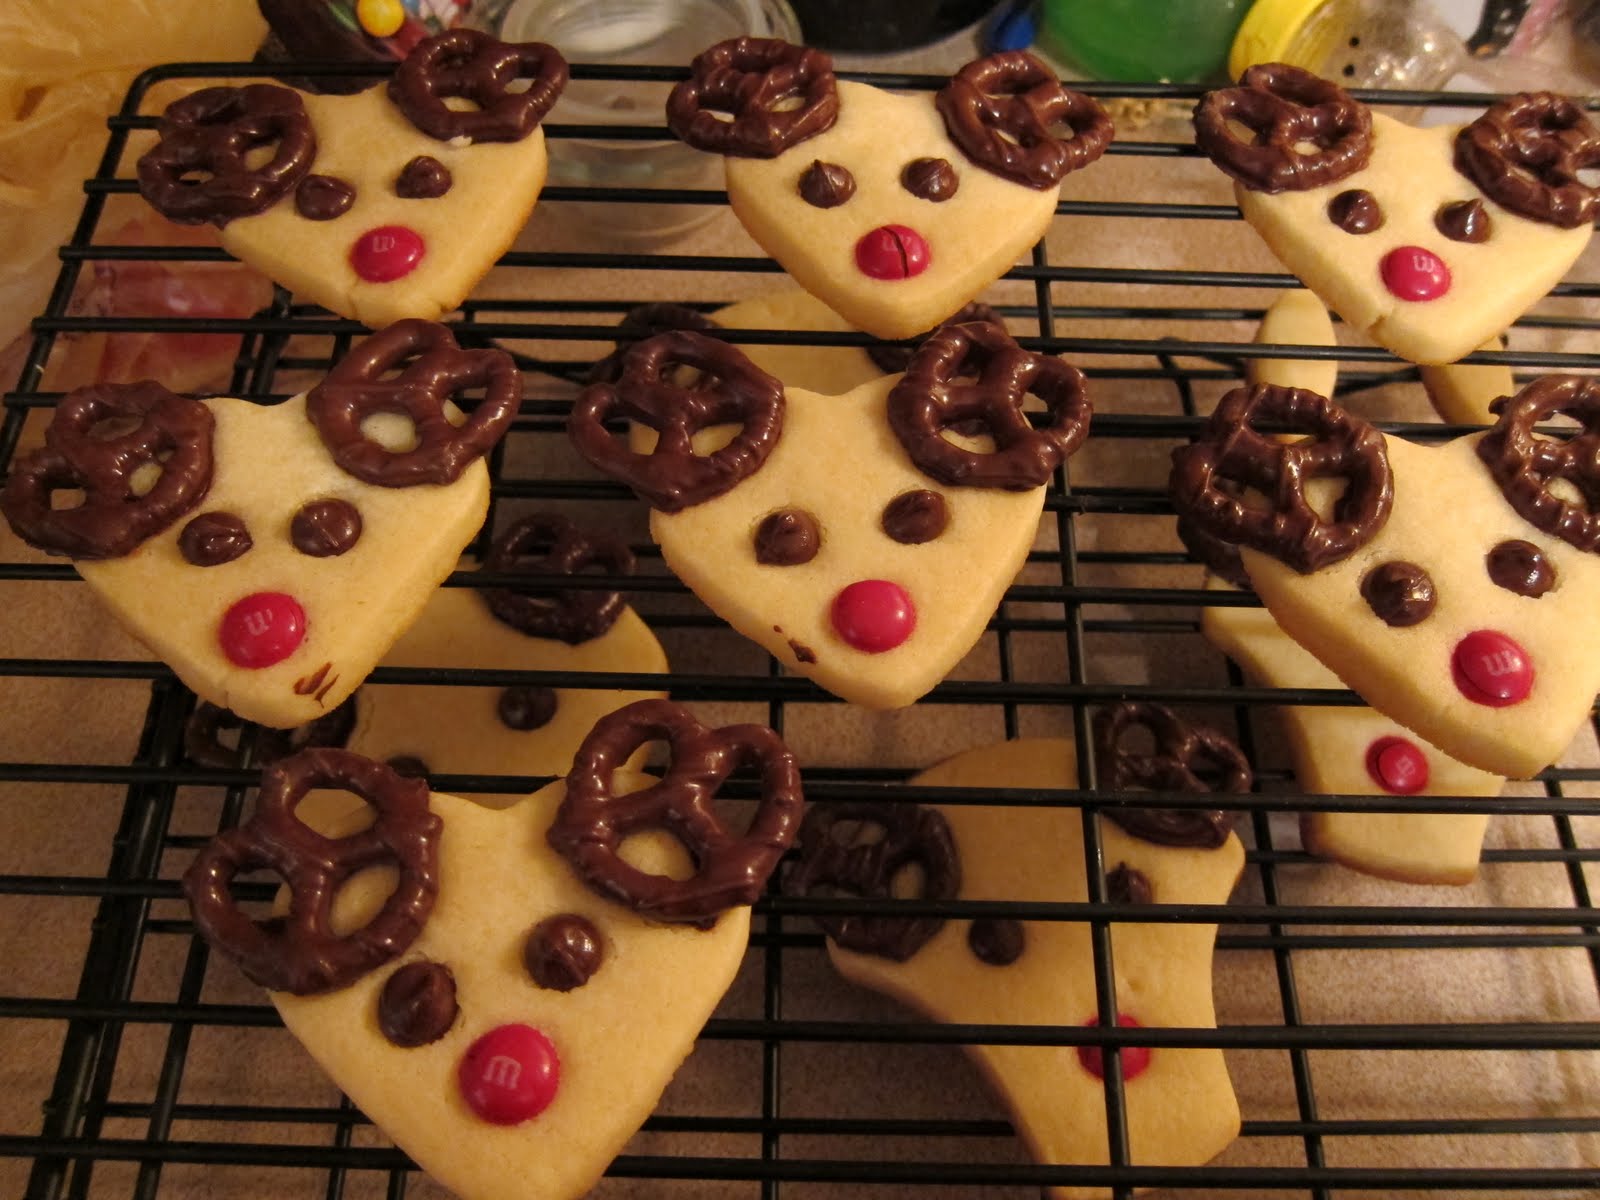
Reindeer Cookies

Someone made these cookies for Jacob's holiday party last week and I just had to try and make them. There really isn't a recipe for them it is more of decorating cookie dough. The only thing I did different was use sugar cookie dough instead of peanut butter cookie dough. I used a heart shaped cookie cuter instead of trying to make triangles. I also put the M&Ms on before they went into the oven and stuck all the chocolate stuff on when they came out of the oven...super easy and super cute!


Wednesday, December 15, 2010

Pretzel Things...

Today Jacob had a holiday celebration at school and I signed up to bring juice but couldn't pass up the opportunity to make something as well.

I have seen these all over the place lately and I know Heidi just made something similar so I had to give it a try.


Chocolate Pretzel Things

Waffle type pretzels

Hershey Kisses (I used the caramel ones)

M&Ms


1) Preheat over to 275


2) Put the kisses on the pretzels


3) Put in the oven for 2 - 3 minutes (I did 3 and it was too long probably because it was the caramel kind). Take out and put one M&M on top of each pretzel/chocolate.


4) Put in the refrigerator to cool for about 10 minutes. Then eat them!


Review: These are super easy to make and so addictive it isn't funny. I know Heidi made them using rolos and a pecan on top but since I was bringing them to school I didn't want to use nuts. This is a keeper for sure and a great treat to make as a gift for someone...

Dinner Week of 12/12 - 12/18

I am starting to feel the holiday laziness for cooking dinner...

Sunday - Had take-out because we were out all day
Monday - Spaghetti and Meatballs
Tuesday - Tuna Casserole
Wednesday - Picadillo and Rice
Thursday - Baked Chicken cutlets with pasta and veggies
Friday - Went out for dinner
Saturday - Pizza

Sunday, December 12, 2010

Dinner Week of 12/5-12/11

I forgot to keep track of what I made this week but I think I got most of it...

Sunday - Had a Hanukkah Dinner at Oma's
Monday- I can't Remember
Tuesday - Beef Stew in the slow cooker
Wednesday - Sausage Pasta - I changed things a little bit but this is where I got the idea
Thursday - Sweet & Sour Tofu Stir Fry - I prepared the tofu the same way from this recipe but I made a sweet & sour sauce and added it to some broccoli, scallions, mushrooms and red pepper.
Friday - Pizza
Saturday - At at Ma & Pa's

Randy

Monday, December 6, 2010

Butter-Pecan Kringle

I am amazed on how much nuts cost every year. When I went to buy pecans for my Thanksgiving dessert I realized that I could get almost 3 times as much at my wholesale club then buying them at the supermarket. The only "problem" I was left with was I had a lot of nuts leftover.

Of course I started to search for more pecan dessert recipes to try out. I found this one and the very next day Heidi sent me the recipe as well...well then I just had to make it for the next gathering!


Easiest Butter-Pecan Kringle

www.kingarthurflour.com

Base

  • 1/2 cup butter, cut into pats
  • 1 cup King Arthur Unbleached All-Purpose Flour
  • 1/2 teaspoon salt*
  • 1/4 cup cold water
  • *Reduce salt to 1/4 teaspoon if you use salted butter.

Pastry topping

  • 1 cup water
  • 1/2 cup butter
  • 1/2 teaspoon salt*
  • 1 cup King Arthur Unbleached All-Purpose Flour
  • 3 large eggs, at room temperature
  • 1/2 teaspoon butter rum, eggnog, or vanilla butternut flavor, optional but delicious
  • *Reduce salt to 1/4 teaspoon if you use salted butter.

Pecans and caramel

  • 12 ounces caramel, cut from a block (about 1 cup, packed); or about 3 dozen individual caramel candies*, unwrapped
  • 2 cups pecan halves, toasted in a 350°F oven till golden brown
  • *Use fresh, soft caramels. If using harder, supermarket-type caramels, add a couple of tablespoons milk or cream when melting, to keep them soft on the kringle; or substitute caramel sauce.

Glaze

  • 1 cup confectioners' or glazing sugar
  • 2 tablespoons heavy cream, half and half, or milk, enough to make a thick but pourable glaze
  • 1/8 teaspoon butter rum, eggnog, or vanilla butternut flavor, optional but good
  • pinch of salt

Directions

1) Preheat the oven to 350°F. Lightly grease (or line with parchment) a baking sheet that's at least 18" x 13"; or a 14" round pizza pan.

2) To make the base: Combine the butter, flour, and salt, mixing till crumbly. Add the water, and stir to make a soft, sticky dough.

3) Wet your hands, pick up the dough, and shape it into a 12" x 8" oval ring on the sheet pan; or a 10" ring in the pizza pan. This will be messy going, but just keep wetting your fingers and pushing it into a ring.

4) Once you've made the ring, flatten the dough so it's about 1 1/2" wide; basically, it'll look like a train or NASCAR track.

5) To make the pastry topping: Place the water, butter, and salt in a saucepan, and heat over medium heat till the butter is melted and the mixture is boiling.

6) Transfer to a mixing bowl, and immediately add the flour, beating until the mixture is cohesive and starts to form a ball.

7) Beat in the eggs one at a time, making sure each is fully incorporated before adding the next. Add the flavor at the end, if you're using it.

8) Spread the pastry along the ring, covering it completely; you'll now have a much wider ring, though it won't be completely closed in the center; it should still look like a ring.

9) Bake the kringle for 50 to 60 minutes, till it's a deep golden brown. If you haven't yet toasted your pecans, this is a good opportunity to do so; they'll need about 9 to 11 minutes in the oven. When they're golden, remove them from the oven and cool. When the kringle is done, remove it from the oven, and allow it to cool completely on the pan.

10) To add the pecans and caramel: First, have the pecans all ready beside the pan of kringle; you'll be sprinkling them atop the caramel as soon as you pour it on.

11) Place the caramel in a microwave-safe spouted cup, if you have one; it's not necessary, but makes it easier to pour. Melt the caramel till it's bubbly, remove it from the microwave, stir a few times to smooth out the bubbles, and immediately drizzle it over the kringle. If it stiffens up, reheat briefly in the microwave.

12) Sprinkle pecans atop the caramel, pressing them in gently. Allow the kringle to cool completely.

13) To make the glaze: Stir together the confectioners' sugar, salt, flavor (if you're using it), and enough milk or cream to make a pourable glaze. Drizzle it over the kringle.

14) To serve, cut the kringle in 2" slices. Yield: one large (12" x 16" oval, or 14" round) kringle, about 2 dozen servings.


Review: I am not sure how you make a regular kringle but I did find this one pretty easy and straight forward. There are a few parts to make but really worth the effort. I always love it when a recipe from KAF website is featured on their blog (Bakers Banter) with step by step photos because it always gives me an idea of if I am doing it correct. I used parchment paper on the bottom so it was easier to transfer it to a platter to bring to my Mom's house. I also used the caramel sauce instead of making my own caramel or using store bought caramel. The only problem with this is that the caramel doesn't set and stays in a liquid type form. I did put it in a really cool place which got it to set a little bit but once it got to room temp it was liquid again. The only thing I was worried about with this that it was going to make my Kringle soggy which it did not but next time I will try to use real caramel instead. All in all this was a real crowd pleaser and would be perfect for a brunch. It is a keeper for sure!

Monday, November 29, 2010

Pecan Tassies

I was asked to bring a dessert to my cousin's house for Thanksgiving this year. I wanted to do something that was a twist (sort of) on Pecan Pie but wasn't as big as a whole pie. My family loves dessert so I knew that there would be a ton and this recipe would give a little taste...

Pecan Tassie
allrecipes.com

(not my picture I got it from allrecipes.com)


2 cups margarine
4 (3 ounce) packages cream cheese
4 cups all-purpose flour
3 eggs
2 1/2 cups packed brown sugar
3 tablespoons melted butter
1/2 teaspoon vanilla extract
1 pinch salt
1 1/2 cups chopped pecans

Directions:

1. Preheat the oven to 350 degrees F (175 degrees C).

2. In a medium bowl, mix together the margarine and cream cheese until well blended. Beat in flour, 1 cup at a time, until the mixture forms a smooth dough. Roll into small balls, and press into the bottoms and sides of tart pans or mini muffin pans.

3. In another bowl, mix together the eggs, brown sugar, butter, vanilla, and salt. Stir in the pecans. Use a spoon to fill each of the crusts 2/3 full with the filling mixture.

4. Bake for 15 to 18 minutes in the preheated oven, until shell is light brown, and the filling has puffed up. Cool, and carefully remove from pans.


Review: I decided to cut the recipe in half because it yields 5 dozen and I really didn't need to bring that many with me and I also only had one mini muffin tin. I highly suggest If you make this recipe having more then one because it takes forever otherwise. I thought they came out great and looked to me like mini pecan pies which is what I was going for....so I am happy :)

Dinner Week of 11/28 - 12/4

This week might be light on meals since we are all under the weather...

Sunday - Thanksgiving leftover sandwiches
Monday - Wanton Soup
Tuesday - nothing (sick)
Wednesday - Chicken Noodle Soup
Thursday - Mike made pasta (I was sick again)
Friday - Pizza
Saturday - Tacos

Sunday, November 28, 2010

Dinner Week of 11/21 - 11/27

This is going to be a light week on cooking with the Thanksgiving...not that I am complaining.

Sunday - Baked Ziti with a salad
Monday - Steak and potatoes
Tuesday - Chili and rice
Wednesday - Pizza
Turkey Day - Turkey and all the extra stuff with my side of the family
Friday - Hamburgers and chips
Saturday - Second turkey dinner with my in-laws

Saturday, November 20, 2010

Dinner Week of 11/14 - 11/20

This is what we had for dinner this past week:

Sunday - Ate at Ma & Pa's house
Monday - Tacos
Tuesday - Spaghetti and Meatballs
Wednesday - Leftovers (Split Peas Cuban style)
Thursday - Went out for Dinner
Friday - Pizza
Saturday - Went out for dinner

Wednesday, November 17, 2010

Toasted Marshmallow Milkshake

So I was catching up on some of the blogs I follow and came across the recipe for Toasted Marshmallow Milkshake. I was missing our campfire nights and thought that this might fill the void in a way. Also Jacob came home from school that day and they made milk shake that day. So he was all excited about making some at home.

Toasted Marshmallow Milkshake
joythebaker.com
adapted just slightly from Spike Mendelsohn’s recipe

makes two small or one large milkshake

8-10 large marshmallows
3 large scoops vanilla ice cream or a heaping 1-cup of vanilla ice cream
1/2 cup of milk
1/2 teaspoon vanilla extract

Place marshmallows on skewer and toast until slightly charred over a gas flame. If you don’t have skewers or a gas range, you can toast the marshmallows on a sheet tray in the broiler for 2 or 3 minutes. Keep an eye on the marshmallows as they’re in the oven. They’re liable to burst into marshmallow flames pretty quick. Place on a plate to cool slightly.

In a blender mix together ice cream, milk, vanilla extract and toasted marshmallows. Save one or two toasted marshmallows to top the milkshake(s). Blend well. For a thinner milkshake add more milk. If you’d like it a bit thicker… add more ice cream. Pour into glasses and top with toasted marshmallows. Enjoy on the quick.

Review: I did not use her method for toasting the marshmallows because Mike feared I would burn the house down. I put the marshmallows on a cookie sheet and put it under the broiler for a few minutes. I think this does a lot faster then doing 8-10 over a gas flame and the flavor came out the same...toasted. I liked the way the milkshake tasted but it was SUPER sweet and just a little goes a long way. I am not sure I would make this again just because it was so sweet but maybe next time try making it with chocolate ice cream...sort of like a s'more milkshake...just put a graham cracker garnish and there you go...

Blue M&M face

Wednesday, November 10, 2010

Keeping Track of Meals....

I have a problem with meal planning...I do it for a couple of weeks and then I stop doing it. I get upset that I stopped and try to start again. I sometimes just have a hard time thinking ahead. What if I am not in the mood to eat what I planned...or what if I get lazy (or busy). So I think I am going to try and just keep track of what I make this month for dinner and maybe see if that helps me with future planning....

Last night I made:
Sloppy Joes


Monday, November 8, 2010

Margarita Cookies

We just celebrated my husband's grandparents 90th birthday this past weekend. Of course I took this opportunity to try out a recipe I have had on my list forever. I was also missing our Friday Night Fun nights a little bit and this recipe reminded me of it.

I got the recipe from
Smitten Kitchen which you should stop over and look at the step by step pictures. I have to say mine looked just like the pictures (for once) and since my camera is still on it's way out and I packaged up the cookie right away for the party I didn't get any.

Margarita Cookies
Adapted from Dorie Greenspan’s Sablés au Citron

Makes about 50 cookies

2 sticks (8 ounces; 230 grams) unsalted butter, at room temperature
2/3 cup (70 grams) confectioners’ sugar, sifted
2 large egg yolks, at room temperature
Pinch of salt
2 teaspoons tequila
Grated zest of 2 limes
Grate zest of half an orange
2 cups (280 grams) all-purpose flour

Coating:
Approximately 1/2 cup clear sanding or other coarse sugar
2 teaspoons flaky Maldon sea salt*

1. Put the butter in the bowl of a mixer fitted with the paddle attachment and beat at medium speed until it is smooth. Add the sifted confectioners’ sugar and beat again until the mixture is smooth and silky. Beat in 1 of the egg yolks, followed by the salt, tequila, grated lime and orange zest. Reduce the mixer speed to low and add the flour, beating just until it disappears. It is better to underbeat than overbeat at this point; if the flour isn’t fully incorporated, that’s ok–just blend in whatever remaining flour needs blending with a rubber spatula. Turn the dough out onto a counter, gather it into a ball, and divide it in half. Wrap each piece of dough in plastic wrap and refrigerate for about 30 minutes.

2. Working on a smooth surface, form each piece of dough into a log that is about 1 to 1 1/4 inches (2.5 to 3.2 cm) thick. (Get the thickness right, and the length you end up with will be fine.) Wrap the logs in plastic and chill for 2 hours. (The dough can be wrapped airtight and kept refrigerated for up to 3 days or stored in the freezer for up to 1 month.)

3. Position the racks to divide the oven into thirds and preheat the oven to 350°F (180°C). Line two baking sheets with parchment paper.

4. While the oven is preheating, work on the sugar coating: Whisk the remaining egg yolk in a small bowl until it is smooth and liquid enough to use as a glaze. Mix the coarse sugar and flaky salt well and spread the mixture out on a piece of wax paper. Remove the logs of dough from the refrigerator, unwrap them, and brush them lightly with a little egg yolk. Roll the logs in the sugar, pressing the sugar/salt mixture gently to get it to stick if necessary, then, using a sharp slender knife, slice each log into cookies about 1/4 inch (7 mm) thick. [Deb note: To get the sugar/salt mixture to stick better, I moved the log over to a piece of plastic wrap, and in the sort of technique you'd see a sushi chef use to shape a roll, use the plastic to press the sugar in by wrapping it tightly.] (You can make the cookies thicker if you’d like; just bake them longer.) Place the cookies on the lined baking sheets, leaving about 1/2 inch (1.5 cm) space between them.

5. Bake the cookies for 12 to 14 minutes, or until they are set but not browned. (It’s fine if the yolk-brushed edges brown a smidgen.) Transfer the cookies to cooling racks to cool to room temperature.

Keeping: Packed airtight, the cookies will keep for about 5 days at room temperature. Because the sugar coating will melt, these cookies are not suitable for freezing.

* Updated to add that if you should choose to use regular table salt and not Maldon, use less! Much less. Probably half or less. Because Maldon has such volume, the equivalent amount of a finer salt would be much more pungent. Better on the safe side than sorry, right?


Review: Like I said in the post above I really have been missing our Friday night fun nights...and I was hoping this would cure that. I also have had this recipe on my list of things I want to make for a long time. Making the recipe was not bad at all...I did steps one and two one day and continued with the rest the next day. I used kosher salt on the outside and I think that added that real margarita feel to it to have the salty/sweet combo. Everyone at the party seemed to really enjoy the cookies and I think this one might be a keeper...


Monday, September 20, 2010

Holiday Bread

I have to confess that my list of things I want to make is getting longer and longer by the minute. I just keep finding things out there that I want to try and make. So I decided to kill two birds with one stone...make something from my list and make something that goes well with the Jewish holidays...Raisin Challah.

I actually wanted to make a different recipe at first but I only had two eggs left and most called for at least 3 in the recipes. This one did call for 3 but the third one was sort of optional.


Raisin Challah
King Arthur Flour


Dough:
1/2 cup lukewarm water
6 tablespoons vegetable oil

1/4 cup honey

2 large eggs

4 cups All-Purpose Flour

1 1/2 teaspoons salt

5 teaspoons instant yeast

1 1/2 cups golden raisins, packed


Topping:

1 large egg beaten with 1 tablespoon cold water

2 tablespoons coarse white sparkling sugar
, optional

Directions

1) To make the dough: Combine all of the dough ingredients except the raisins, and mix and knead them, by hand, mixer, or bread machine, until you have a soft, fairly smooth dough.

2) Allow the dough to rise, covered, for 2 hours, or until it's puffy though probably not doubled in bulk.

3) Gently deflate the dough, and knead in the raisins.

4) Lightly grease a 9" round cake pan.

5) Roll the dough into a 30" to 36" rope. If it shrinks back, walk away and leave it alone for 10 minutes, then resume rolling. The longer the rope the more distinct the spiral, but if it isn't exactly 36" long, don't stress; just get as close as you can.

6) Coil the rope into the prepared pan, starting in the center.

7) Cover the challah gently with lightly greased plastic wrap or a proof cover, and allow it to rise for about 60 to 90 minutes, until it's puffy and pretty much fills the pan.

8) Near the end of the bread's rise, preheat the oven to 375°F.

9) Whisk together the egg and water. Brush the risen dough with the egg mixture. Sprinkle with coarse white sugar, if desired.

10) Bake the bread for 20 minutes, tent it with foil and bake for an additional 15 to 20 minutes, until it's a deep, golden brown, and an instant-read thermometer inserted into the center registers 190°F.

11) Remove the bread from the oven, and after a minute or so carefully transfer it to a rack. Cool the bread to lukewarm before cutting it.

The suggested glaze, made with a whole egg and water, makes the bread's crust deep-brown and shiny. for a lighter brown (but still shiny) crust, use a glaze made of egg white and water. For a lighter-brown, matte crust, dispense with the glaze altogether.


Review: I used my bread machine and left it in there for the two hour first rise. It was almost too big for that but I didn't have a problem in the end. I felt like I didn't knead the raisins in right but I got them into the dough. It was also really hard to roll into the 30" - 36" rope and you needed to let it sit for 10 minutes so it was easier to work with. I liked the taste of this bread and I think I would make it again. To me it seemed like it would be the perfect bread to make french toast with if there were any leftovers....


Monday, September 6, 2010

Easy Appetizer - Olive Puffs

I have to say our Friday night fun nights have generated a lot of experimenting for me with appetizer type recipes. This one came about because I was trying to make Samosas and bought the wrong dough. The recipe calls for phyllo dough and I bought puff pastry.

I had to find something to do with the puff pastry dough because even though I had it in the freezer and it would have kept for a while it was calling my name. The other thing I couldn't get off my mind was that olive appetizer from our anniversary dinner at
Amici's. So my search was on for something to make with olives.

This is the one I found which hopefully would have satisfy my olive craving and a bonus it also would use up my puff pastry dough.

Olive Puffs

allrecipe.com

24 pimento stuffed green olives
1 package puff pastry dough, defrosted

1) Preheat oven to 400 degrees F (200 degrees C).

2) Cut pastry into strips about 6 inches long and 1/2 inch wide. Wrap a belt of pastry around each olive. Place on an ungreased baking sheet.

3) Bake for 20 minutes, or until golden brown.

Review: It can't get any easier then 2 ingredients if you ask me. Also I made then a little bit ahead of time, put them in the refrigerator and baked closer to serving time. I recommend you letting them cool off a little bit before serving them. The olives in the were supper hot just out of the oven and once cooled down it was easier to eat. Next time I make these I make splurge and buy the Gorgonzola stuff olives I saw at the supermarket olive bar and use those which might make them more like the olive appetizer I was craving. This one is a keeper!

Tuesday, August 31, 2010

Orange You Glad You Came...

I saw this on a post about a month ago and it has been in my mind ever since...Campfire Orange Cakes! I just thought this would be something fun to do while we sit around the fire pit with the neighbors. If anything it would be a conversation piece and a bonus of eating yummy cake at the end. I did not take any pictures of my process because if you go over to ljcfyi's blog she has detailed pictures. Also I prepared them ahead of time and was in a rush to get other stuff done.

I did find a little trick (of course at the end) on how to scoop out the insides. It is sort of hard to explain but you basically try to get your finger in between the skin and the "meat"....I will have to take pictures the next time I do this.

Review: I found this to be a fun idea and I think everyone enjoyed it as well. I think the hardest and most time consuming part of this recipe is taking the "meat" out of the oranges. I only bought 4 oranges and had probably enough cake batter left for at least 4 more oranges. I think the reason for that is I couldn't find those huge oranges that you sometimes find out there. I now find myself thinking about what else I could use in place but so far the only thing I thought of is a grapefruit. I think my next campfire cooking adventure might be the banana boats.

Monday, August 23, 2010

Brownie Mosaic Cheesecake

This always happens to me...I am searching for a recipe (this time it was for an Oreo type cookie) and come across at least a few others I want to try. I file them into my folder of recipes I want to try and usually don't get to them. This time I was determined not to let that happen again because I found a recipe that made my heart jump a couple of beats....

Brownie Mosaic Cheesecake.

You have to check out the page on where I found it because it has really nice pictures and the full recipe there. I took a couple of pictures of my cheesecake just out of the oven and once I put the ganache onto it.

Just out of the oven
With the ganache onto....yummy!

Review: For the most part this was an easy recipe to make but it is just time consuming because of all the part. I made the brownie part of it Thursday night and put it in the refrigerator. Friday I made the rest of the cheesecake parts. No part was really that complicated in fact my neighbor told me the brownies were the best brownies she ever had (Baker's One Bowl Brownie)...I brought over the extras for our Friday night get together. I don't think there is anything I would do different because it tasted really good as is and I think everyone at the party liked it. The ganache part was perfect because as you can see from my out of the oven picture I got a few cracks that those were covered right up by the ganache. The ganache recipe also makes just the perfect amount to go on top. Heidi wants me to make it bring to my Mom's house for the holidays coming up...so I think this one is a keeper!

LinkWithin

Related Posts with Thumbnails