This month's challenge is brought to us by Karen of Bake My Day and Zorra of 1x umruehren bitte aka Kochtopf. They have chosen Tuiles from The Chocolate Book by Angélique Schmeink and Nougatine and Chocolate Tuiles from Michel Roux.
I have to say I was very excited when I heard that we were going to be making Tuiles this month. It has been one of those recipes that I have seen in many cookbooks but never had the guts to try it out. Not that I felt like it was a hard recipe to make but just seemed that way.
I decided to make the first tuile recipe from The Chocolate Book just because I had everything in the house already.
Following is a recipe taken from a book called “The Chocolate Book”, written by female Dutch Master chef Angélique Schmeinck.
Recipe:
Yields: 20 small butterflies/6 large (butterflies are just an example)
Preparation time batter 10 minutes, waiting time 30 minutes, baking time: 5-10 minutes per batch
65 grams / ¼ cup / 2.3 ounces softened butter (not melted but soft)
60 grams / ½ cup / 2.1 ounces sifted confectioner’s sugar
1 sachet vanilla sugar (7 grams or substitute with a dash of vanilla extract)
2 large egg whites (slightly whisked with a fork)
65 grams / 1/2 cup / 2.3 ounces sifted all purpose flour
1 table spoon cocoa powder/or food coloring of choice
Butter/spray to grease baking sheet
Oven: 180C / 350F
Using a hand whisk or a stand mixer fitted with the paddle (low speed) and cream butter, sugar and vanilla to a paste. Keep stirring while you gradually add the egg whites. Continue to add the flour in small batches and stir to achieve a homogeneous and smooth batter/paste. Be careful to not overmix.Cover the bowl with plastic wrap and chill in the fridge for at least 30 minutes to firm up. (This batter will keep in the fridge for up to a week, take it out 30 minutes before you plan to use it).
Line a baking sheet with parchment paper or grease with either butter/spray and chill in the fridge for at least 15 minutes. This will help spread the batter more easily if using a stencil/cardboard template such as the butterfly. Press the stencil on the baking sheet and use an off sided spatula to spread batter. Leave some room in between your shapes. Mix a small part of the batter with the cocoa and a few drops of warm water until evenly colored. Use this colored batter in a paper piping bag and proceed to pipe decorations on the wings and body of the butterfly.
Bake butterflies in a preheated oven (180C/350F) for about 5-10 minutes or until the edges turn golden brown. Immediately release from baking sheet and proceed to shape/bend the cookies in the desired shape. These cookies have to be shaped when still warm, you might want to bake a small amount at a time or maybe put them in the oven to warm them up again. (Haven’t tried that). Or: place a baking sheet toward the front of the warm oven, leaving the door half open. The warmth will keep the cookies malleable.
If you don’t want to do stencil shapes, you might want to transfer the batter into a piping bag fitted with a small plain tip. Pipe the desired shapes and bake. Shape immediately after baking using for instance a rolling pin, a broom handle, cups, cones….
Review: This recipe for me was a great introduction into making tuiles because now I want to try other recipes I have seen. My fear of them is gone and I want to try different shapes as well. I took picture but won't be able to post them for a while since my husband took the camera with him before I could get them off of there. I used a rolling pin to shape them and a also muffin cups to shape the butterflies. oh I just realized I forgot to tell you what I put them on...my son's birthday cupcakes (well sort of) I kept a few aside and made them for me and my husband.
Monday, January 26, 2009

Sunday, January 4, 2009
Hot Buttered Pretzels
My mother-in-law gave me the King Arthur Flour Baker's Companion Cookbook for Christmas. There are a ton of recipes in there I want to try, but when I came a cross the recipe for Hot Buttered Pretzels, I knew I had all the ingredients in the house. Plus it was Sunday, which means Football!!!

Hot Buttered Pretzels
Dough
2 1/2 cups King Arthur Unbleached All-Purpose Flour
1/2 teaspoon salt
1 teaspoon sugar
2 1/4 teaspoons regular instant yeast
7/8 to 1 cup warm water*
Topping
1/2 cup warm water
1 teaspoon sugar
coarse, kosher or pretzel salt (optional)
3 tablespoons unsalted butter, melted

Hot Buttered Pretzels
Dough
2 1/2 cups King Arthur Unbleached All-Purpose Flour
1/2 teaspoon salt
1 teaspoon sugar
2 1/4 teaspoons regular instant yeast
7/8 to 1 cup warm water*
Topping
1/2 cup warm water
1 teaspoon sugar
coarse, kosher or pretzel salt (optional)
3 tablespoons unsalted butter, melted
*Use the greater amount in the winter, the lesser amount in the summer, and somewhere in between in the spring and fall. Your goal is a soft dough.
Place all of the dough ingredients into a bowl, and beat till well-combined. Knead the dough, by hand or machine, for about 5 minutes, till it's soft, smooth, and quite slack. Flour the dough and place it in a bag, and allow it to rest for 30 minutes.
Preheat your oven to 500°F. Prepare two baking sheets by spraying them with vegetable oil spray, or lining them with parchment paper.
Transfer the dough to a lightly greased work surface, and divide it into eight equal pieces (about 70g, or 2 1/2 ounces, each). Allow the pieces to rest, uncovered, for 5 minutes. While the dough is resting, combine the 1/2 cup warm water and the sugar, and place it in a shallow bowl.
Roll each piece of dough into a long, thin rope (about 28 to 30 inches long), and twist each rope into a pretzel, as illustrated. Dip each pretzel in the warm water mixture (this will give the pretzels a nice, golden-brown color), and place them on the baking sheets. Sprinkle them lightly with coarse, kosher, or pretzel salt. Allow them to rest, uncovered, for 10 minutes.

Bake the pretzels for 8 to 9 minutes, or until they're golden brown, reversing the baking sheets halfway through.
Remove the pretzels from the oven, and brush them thoroughly with the melted butter. Keep brushing the butter on until you've used it all up; it may seem like a lot, but that's what gives these pretzels their ethereal taste. Eat the pretzels warm, or reheat them in an oven or microwave. Yield: 8 pretzels.
My Review: The pretzels were easy to make and really tasty. I would definitely make them again. The only problem was that I used parchment paper. Which I found out is only good up to 420 degrees. After 8 minutes in 500 degrees it starts to burn. I would have baked the pretzels a little longer, but was afraid the parchment paper was going to catch on fire. Next time I'll just grease the baking sheets.
Tuesday, December 16, 2008
Holiday Party 2008

This past weekend we had a holiday party for our family and friends. I decided this year to take off the day before, so I could get all of my cooking and baking out of the way and wasn't exhausted come Saturday night. We had a huge turnout and it was great to see people catching up and also getting acquainted with one another. I made some new recipes this year that I absolutely loved how they turned out and they seemed to have been a hit with everyone as well. Unfortunately, I didn't get any pictures of the food (maybe someone will send me some!), but at least I can share the recipes!
Ingredients:
2 - 3 oz. boxes of pineapple jello
1/4 cup coconut milk
coconut rum (see amounts below)
cold water (see amounts below)
Directions:
- Chill rum in freezer for 2 hours before making.
- Dissolve the jello according to box directions in 2 cups boiling water for 2 minutes.
- Depending on how strong you want your shots follow these guidelines:
> For mild shots add 1 cup cold rum, 3/4 cup cold water 1/4 cup coconut milk
> For stronger shots add 1 & 1/2 cups cold rum 1/4 cup cold water, and 1/4 cup coconut milk
- Dissolve the jello according to box directions in 2 cups boiling water for 2 minutes.
- Depending on how strong you want your shots follow these guidelines:
> For mild shots add 1 cup cold rum, 3/4 cup cold water 1/4 cup coconut milk
> For stronger shots add 1 & 1/2 cups cold rum 1/4 cup cold water, and 1/4 cup coconut milk
- Mix with a spoon, then ladle into 1.25 oz. shot glasses of your choice. (You can either pour the mixture into the shot glasses or use a turkey baster to transfer the liquid into the cups.)
- Put into refrigerator. If you want a fast set put them into the freezer for an hour. Or make ahead and freeze for a while and then bring out about an hour before the party.
Review: Absolutely love these jello shots! Some people like them stronger. I, personally, like when you don't taste the alcohol, but know it is there, so I don't make them too strong. I have seen recipes where people omit the "extra" water and use all rum. Another tip is to spray the Solo cups (available at Party City) with Pam, which makes it easier for them to slide out.
Ingredients:
1 can (19-ounce) cannellini beans, drained and rinsed
3 tablespoons olive oil
3 tablespoons freshly squeezed lemon juice (about 1 lemon)
Coarse salt and ground pepper
1 can (19-ounce) cannellini beans, drained and rinsed
3 tablespoons olive oil
3 tablespoons freshly squeezed lemon juice (about 1 lemon)
Coarse salt and ground pepper
Directions:
In a food processor, combine cannellini beans, olive oil, 3 tablespoons fresh lemon juice (about 1 lemon); season with coarse salt and ground pepper. Puree until smooth.
Place puree in a serving bowl, and lightly sprinkle chili powder over the top, if desired. Serve dip with toasted pita chips.
Review: Super simple to make and I was surprised at how much I actually liked this! I am not big into hummus, but this may swing my vote. (haha) I actually doubled this recipe (which in my Cuisinart food processor was a bit of a chore) and doubled everything except the lemon juice. I just used 1 lemon and thought it was perfect.
Ingredients:
1 lb. package Ziti pasta or Rigatoni
24 ounces ricotta cheese
1 pound shredded mozzarella cheese
1 egg, beaten
1 (32 ounce) jar spaghetti sauce
1/4 cup grated Parmesan cheese
24 ounces ricotta cheese
1 pound shredded mozzarella cheese
1 egg, beaten
1 (32 ounce) jar spaghetti sauce
1/4 cup grated Parmesan cheese
Directions:
- Bring a large pot of lightly salted water to a boil. Add ziti and cook for 8 to 10 minutes or until al dente; drain and rinse.
- In a medium bowl, mix ziti, ricotta cheese, mozzarella cheese, egg and 1 1/2 cups spaghetti sauce.
- Preheat oven to 375 degrees F (190 degrees C).
- Lightly grease a 9x13 inch baking dish and spoon in ziti mixture. Top with remaining spaghetti sauce, followed by Parmesan cheese.
- Bake in preheated oven for 30 minutes; let stand for 15 minutes before serving.
- In a medium bowl, mix ziti, ricotta cheese, mozzarella cheese, egg and 1 1/2 cups spaghetti sauce.
- Preheat oven to 375 degrees F (190 degrees C).
- Lightly grease a 9x13 inch baking dish and spoon in ziti mixture. Top with remaining spaghetti sauce, followed by Parmesan cheese.
- Bake in preheated oven for 30 minutes; let stand for 15 minutes before serving.
Review: This will be my baked ziti recipe going forward. Of course, I didn't have one before, knew in my head what the ingredients should be, so this was perfect for tying it all together. I have read some reviews that said they would cut down the amount of ricotta, you absolutely can do that. I really enjoyed this. I made a double batch for the party and it filled up 2 half-trays, which worked out perfectly for 40 people (along with the rest of the food). I make my own sauce, so not exactly sure how many ounces of sauce I put into it, but it was the equivalent of 4 large (24 oz) cans of crushed tomatoes and whole tomatoes with one small can of tomato paste, which are cooked down to remove excess water). I made these ahead and put them in the fridge and then baked for 30 minutes ahead of eating. I kept them covered with foil.

Ingredients:
1 pinch salt
1/2 cup all-purpose flour
2 (6 ounce) skinless, boneless chicken breast halves
2 tablespoons olive oil
1/4 cup dry white wine
1/4 cup lemon juice
1/4 cup cold unsalted butter, cut into pieces
2 tablespoons capers, drained
2 lemon wedges
1/2 cup all-purpose flour
2 (6 ounce) skinless, boneless chicken breast halves
2 tablespoons olive oil
1/4 cup dry white wine
1/4 cup lemon juice
1/4 cup cold unsalted butter, cut into pieces
2 tablespoons capers, drained
2 lemon wedges
Directions:
- Mix together salt and flour in a small dish or plastic bag, then coat chicken and shake off excess. Heat olive oil in a skillet over medium-high heat. Shake excess flour from chicken, then brown in hot oil until both sides are golden-brown, and the inside has turned white and firm, 3 to 4 minutes per side.
- Remove the chicken, and set aside in a warm place. Pour white wine into the skillet, and allow to boil as you dissolve the cooked bits from the bottom of the pan. Add the lemon juice, and allow to come to a boil, cook for a few minutes until reduced by half.
- Sprinkle the cubed butter into the boiling sauce. Swirl and shake the pan vigorously to dissolve the butter, thus thickening the sauce. The butter must never come to rest, or the sauce will separate and become oily. Once the butter has completely incorporated, remove from heat and stir in capers.
- To serve, pour lemon-caper sauce over the chicken, and serve with a wedge of lemon.
- Mix together salt and flour in a small dish or plastic bag, then coat chicken and shake off excess. Heat olive oil in a skillet over medium-high heat. Shake excess flour from chicken, then brown in hot oil until both sides are golden-brown, and the inside has turned white and firm, 3 to 4 minutes per side.
- Remove the chicken, and set aside in a warm place. Pour white wine into the skillet, and allow to boil as you dissolve the cooked bits from the bottom of the pan. Add the lemon juice, and allow to come to a boil, cook for a few minutes until reduced by half.
- Sprinkle the cubed butter into the boiling sauce. Swirl and shake the pan vigorously to dissolve the butter, thus thickening the sauce. The butter must never come to rest, or the sauce will separate and become oily. Once the butter has completely incorporated, remove from heat and stir in capers.
- To serve, pour lemon-caper sauce over the chicken, and serve with a wedge of lemon.
Review: Another of my faves and one that had several people asking for the recipe (including Heidi and Michelle (of the Baking Buddies blog)'s mom! =). I had never made this before, but decided this would be relatively easy to make and if nothing else, should be good for a party dish! The recipe above is for 2 servings. Luckily, Allrecipes.com has a servings conversion, which I took full advantage of and besides the reviews was one of the reasons I picked this recipe, as I had bought 10 lbs. of Perdue Chicken Tenders at Costco and needed to convert the recipe based on the pounds of chicken I had! This turned out to be 27 servings! The best part is when you convert to 27 lbs., the conversion takes you literally, so it told me 13 1/2 pinches of salt - lol! Can you imagine counting that out?!
Needless to say, I just took a large Ziplock bag, poured in some flour and shook in some Lawry's Seasoned Salt. I used that to coat the chicken and cook them in 2 separate pans (one dutch oven and one nonstick pan) to cook them faster. The nonstick pan took longer and didn't brown as well. I either sprayed the pans or put in olive oil after each set of chicken tenders to make sure they didn't stick to the pan and then once cooked put them straight into the half trays (the double batch made for 2 half trays). After all of the chicken was cooked, I used the dutch oven to make the sauce.
I put in 3 cups of a white wine and 3 cups of chicken broth, then added 1 stick of unsalted margarine at a time. I was hoping to use less margarine, but the taste wasn't quite right, so I ended up using 3 sticks. I also used 5 lemons (rather than the 3 cups per the conversion). I debated whether or not to add the sauce as I wasn't serving it until the next day, but thought it would be a good marinade, so poured it over top of the chicken.
The next day, I put it in the oven with the 2 trays of ziti and set the oven for 375 degrees for 30 minutes and then put the oven on warm. It seemed to work out well and I would definitely recommend this. I even got compliments that it looked like I had gotten the party catered!

Merry Christmas! Happy Chanukah! Happy New Year!
Tuesday, December 9, 2008
More Snowmen!!
So I had made the Marshmallow Snowmen to give to people at work. Mike really liked how they turned out so he asked me to make him a few. I decided to step them up a notch and give them a hat. I think this will be my new annual holiday treat!
 Here they are all packaged up and ready for delivery!!
Monday, December 8, 2008
Thanksgiving at the Lundgrens - 2008
OREO TURKEY COOKIES
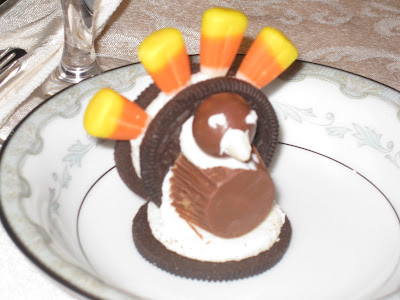
Here are the Turkey cookies I made for Thanksgiving. I had so much fun making these..and they were a hugh hit with my family. I brought a few over to Kevins friends the day before Thanksgiving and they loved them. The girls want to get together next year so I can show them how to make them for their families. Im glad everyone thought they were as cute as I did =)
OUR DINNER SPREAD...
From appetizers, to the main course...to desserts...we had a great day pigging out on delicious foods.


Here are the Turkey cookies I made for Thanksgiving. I had so much fun making these..and they were a hugh hit with my family. I brought a few over to Kevins friends the day before Thanksgiving and they loved them. The girls want to get together next year so I can show them how to make them for their families. Im glad everyone thought they were as cute as I did =)
OUR DINNER SPREAD...
From appetizers, to the main course...to desserts...we had a great day pigging out on delicious foods.


Sunday, December 7, 2008
Holiday Candy Begins....
Candy #1
Every year my candy making for the holidays usually starts the weekend after thanksgiving, but this year it started before Thanksgiving. That's because Kathleen had said she was making these candy turkeys for thanksgiving and when I saw a picture of them I had to make them as well.

I only on made five of them, because I didn't think many adults would eat them. Since my almost 3 year old nephew was really the only child that was going to be there. But to my surprise they all went. Mike was upset that he actually didn't get a chance to have one. Who knew!!
Candy #2
So last year I had a made my peanut clusters for a bunch of people at work as my holiday gift. But this year I have a lot more people I want to give something to, so the search for something as cute as the turkeys began. I even had Michelle helping with the search. What we came across were Marshmallow Snowmen. Chocolate covered that is.....

 What you need to make these cute men....
Marshmallows (b0dy)
White chocolate
Mini m&ms (nose & buttons)
Mini chocolate chips (eyes)
Chocolate Sprinkles (mouth)
Pull and peel twizzlers (scarf)
They are fun to make and once you get a system down, only takes a few hours to make around 27 snowmen.......I would have made more, but I ran out of marshmallows.
Every year my candy making for the holidays usually starts the weekend after thanksgiving, but this year it started before Thanksgiving. That's because Kathleen had said she was making these candy turkeys for thanksgiving and when I saw a picture of them I had to make them as well.

I only on made five of them, because I didn't think many adults would eat them. Since my almost 3 year old nephew was really the only child that was going to be there. But to my surprise they all went. Mike was upset that he actually didn't get a chance to have one. Who knew!!
Candy #2
So last year I had a made my peanut clusters for a bunch of people at work as my holiday gift. But this year I have a lot more people I want to give something to, so the search for something as cute as the turkeys began. I even had Michelle helping with the search. What we came across were Marshmallow Snowmen. Chocolate covered that is.....

 What you need to make these cute men....
Marshmallows (b0dy)
White chocolate
Mini m&ms (nose & buttons)
Mini chocolate chips (eyes)
Chocolate Sprinkles (mouth)
Pull and peel twizzlers (scarf)
They are fun to make and once you get a system down, only takes a few hours to make around 27 snowmen.......I would have made more, but I ran out of marshmallows.
Saturday, November 29, 2008
December Cookie Recipe: Chocolate Chippers
Christmas is my absolute favorite time of the year (followed by Halloween and Thanksgiving). I can remember baking cookies with my mom every year. She would bake batches and batches of cookies and put them in tins, which she would then serve for a Christmas party, Christmas Eve, and Christmas Day. She always made the same couple of cookies - Chocolate Chip, Mexican Wedding Cakes, Graham Cracker Yummies (my fav), Sugar Cookies (which of course, I always HAD to decorate), and Doggie Turds (of course, if you ask her, she'll say they are called Oatmeal Logs or something, but I know better - despite the name, they are a wonderful oatmeal and confectionary sugar based cookie dipped in chocolate and actually is a recipe passed down from Karen's mom).
Well, despite my mom's recipes, I am on the hunt for my own traditional cookies (p.s. Graham Cracker Yummies are always on my list). With December just a couple of days away and our yearly girl's baking weekend coming up in a few weeks, I thought I would start experimenting before the actual day, so I can figure out what I am going to make this year. Tonight, Biz and Justin invited us over for some fajitas and margaritas (yahoo!) and altho the Mexican Wedding Cakes probably more fit the bill, I took a look in my trusty BH&G 1965 ed. "New Cook Book" and stumbled across a cookie called the Chocolate Chippers. I have been craving a chocolate chip cookie (sorry, ladies, not THAT kind of craving ;) and this one seemed to fit the bill.
My mom always had a copy of the BH&G cookbook around when she baked. As I use it more and more, I think it may have been moreso because they use a lot of Crisco in their baking. My dad is lactose intolerant and Crisco is perfect, because there is no trace of milk products (aka butter) and if there was butter, she would use margarine or non-dairy creamer instead of milk. I don't think I started using butter until a few years ago when I realized the flavor was that much better (and no trans fats!). Of course, in this day and age, fortunately unlike some other allergies, my dad can use Lactaid and safely ingest milk-based products (although he still doesn't drink a glass of milk, but then again never did, even before he became lactose intolerant, which started when he was 18, but the doctor didn't diagnose him until he was 28!).
Anyhow, as usual I digress, one lifesaver that Crisco has come up with is their individual Crisco sticks. These things are excellent! No more buying the big tub, which I would never use before it went bad (is that possible with this stuff?!) and scooping it into a measuring cup and then back out into the mixer (you get the idea), now you just cut it like you would cut a stick of butter. Yes, you pay more for convenience, but it is one convenience I don't mind!

Chocolate Chippers
Ingredients:
1/2 cup shortening
1/2 granulated sugar
1/4 cup brown sugar (I used dark brown)
1 egg
1 tsp. vanilla
- - - - - - - - - - - - - - - - - - - - - - - - - - - - - - - - -
1 cup sifted all-purpose flour
3/4 tsp. salt
1/2 tsp. baking soda
1 cup semi-sweet chocolate pieces (I used Nestle Chocolate Chips)
1/2 cup broken/chopped nuts (optional, I omitted)
Oven 375 degrees
Directions:
- Cream together shortening, sugars, egg, and vanilla till light and fluffy.
- Sift together dry ingredients; stir into creamed mixture, blending well.
- Add chocolate pieces and nuts. If desired, add 1/2 cup crushed peppermint stick candy.
- Drop from teaspoon 2 inches apart on greased cookie sheet.
- Bake 10-12 minutes.
- Remove from pan immediately.
Review: I absolutely LOVED these cookies. I will definitely make again this Christmas season. Now, BH&G says the recipe makes 3.5 dozen. I didn't come close to this. I used the medium cookie scoop (also from Pampered Chef) - p.s. I will never do cookies any other way; I used to use the 2 spoon method - you know, the way your grandmother or mom would have taught you back in the day, scoop some cookie mix and then use the other spoon to drop it onto the cookie sheet - no longer necessary with a good metal scoop!! Anyway, I used the medium scoop and only got 21 cookies out of it. Needless-to-say, I will probably at least triple the recipe when I make it for the holidays (as hope to give away some cookies as well). I also tried a new feature on my stove, which I haven't used in the past - the Convection Bake option. When you put in 375, it automatically drops it to 350. I don't know if it made the cookie better or not, but I definitely think I will try this feature again. I hope you enjoy these cookies as well!
Well, despite my mom's recipes, I am on the hunt for my own traditional cookies (p.s. Graham Cracker Yummies are always on my list). With December just a couple of days away and our yearly girl's baking weekend coming up in a few weeks, I thought I would start experimenting before the actual day, so I can figure out what I am going to make this year. Tonight, Biz and Justin invited us over for some fajitas and margaritas (yahoo!) and altho the Mexican Wedding Cakes probably more fit the bill, I took a look in my trusty BH&G 1965 ed. "New Cook Book" and stumbled across a cookie called the Chocolate Chippers. I have been craving a chocolate chip cookie (sorry, ladies, not THAT kind of craving ;) and this one seemed to fit the bill.
My mom always had a copy of the BH&G cookbook around when she baked. As I use it more and more, I think it may have been moreso because they use a lot of Crisco in their baking. My dad is lactose intolerant and Crisco is perfect, because there is no trace of milk products (aka butter) and if there was butter, she would use margarine or non-dairy creamer instead of milk. I don't think I started using butter until a few years ago when I realized the flavor was that much better (and no trans fats!). Of course, in this day and age, fortunately unlike some other allergies, my dad can use Lactaid and safely ingest milk-based products (although he still doesn't drink a glass of milk, but then again never did, even before he became lactose intolerant, which started when he was 18, but the doctor didn't diagnose him until he was 28!).
Anyhow, as usual I digress, one lifesaver that Crisco has come up with is their individual Crisco sticks. These things are excellent! No more buying the big tub, which I would never use before it went bad (is that possible with this stuff?!) and scooping it into a measuring cup and then back out into the mixer (you get the idea), now you just cut it like you would cut a stick of butter. Yes, you pay more for convenience, but it is one convenience I don't mind!

Chocolate Chippers
Ingredients:
1/2 cup shortening

1/2 granulated sugar
1/4 cup brown sugar (I used dark brown)
1 egg
1 tsp. vanilla
- - - - - - - - - - - - - - - - - - - - - - - - - - - - - - - - -
1 cup sifted all-purpose flour
3/4 tsp. salt
1/2 tsp. baking soda
1 cup semi-sweet chocolate pieces (I used Nestle Chocolate Chips)
1/2 cup broken/chopped nuts (optional, I omitted)
Oven 375 degrees
Directions:
- Cream together shortening, sugars, egg, and vanilla till light and fluffy.
- Sift together dry ingredients; stir into creamed mixture, blending well.
- Add chocolate pieces and nuts. If desired, add 1/2 cup crushed peppermint stick candy.
- Drop from teaspoon 2 inches apart on greased cookie sheet.
- Bake 10-12 minutes.
- Remove from pan immediately.
Review: I absolutely LOVED these cookies. I will definitely make again this Christmas season. Now, BH&G says the recipe makes 3.5 dozen. I didn't come close to this. I used the medium cookie scoop (also from Pampered Chef) - p.s. I will never do cookies any other way; I used to use the 2 spoon method - you know, the way your grandmother or mom would have taught you back in the day, scoop some cookie mix and then use the other spoon to drop it onto the cookie sheet - no longer necessary with a good metal scoop!! Anyway, I used the medium scoop and only got 21 cookies out of it. Needless-to-say, I will probably at least triple the recipe when I make it for the holidays (as hope to give away some cookies as well). I also tried a new feature on my stove, which I haven't used in the past - the Convection Bake option. When you put in 375, it automatically drops it to 350. I don't know if it made the cookie better or not, but I definitely think I will try this feature again. I hope you enjoy these cookies as well!
September/October Recipe: Paprika Chicken & Egg Noodles
I thought I would hit two birds with one stone for September and October. Of course, my husband and I eat chicken like it's going out of style (mainly because it is the better meat health-wise). Similar to Michelle, I am always looking to change it up a bit (although do have some old stand-bys when I don't have time to follow a recipe). The great thing about chicken is that you can really eat it so many different ways and add so many different types of spices to it and it just adapts to however you are cooking it.
Another great thing about chicken is that Costco sells it in this HUGE 10lb. bag of Perdue chicken breasts in different sizes (but not as JUMBO as they seem to make them in the supermarket these days). Makes it very convenient as I don't have to bring them home, cut them up and freeze them and whenever I plan on making chicken for dinner, I just take 2 pieces out and defrost them.
Anyhow, I had a Pampered Chef party several months ago and bought their cookbook called "29 minutes to dinner." There were 2 main reasons I decided to buy this cookbook, maybe three. 1) It has pictures. A cookbook with pictures is always a big plus for me. I am a very visual person and pictures just helps spark the creative juices flowing. 2) The P.C. consultant actually had a list of the Weight Watchers points per recipe, which was a HUGE plus! 3. It's small, won't take up too much room on my shelf! =) Oh yeah, and did I mention it's only supposed to take 29 minutes to the meal?! So make that 4 reasons! When I come home from work the last thing I want is to make a meal that takes an hour. Anyhow, I thumbed through the book and found a recipe that had both chicken (September recipe theme) and pasta (October recipe theme). I figured it was a win-win, or was it?
Paprika Chicken and Egg Noodles
Ingredients:
8 ounces green beans
1 pound boneless, skinless chicken thighs
1 tablespoon paprika
½ teaspoon salt
¼ teaspoon coarsely ground black pepper
¼ teaspoon cayenne pepper (optional)
8 ounces mushrooms
1 medium onion
3 tablespoons butter, divided
8 ounces uncooked egg noodles
2 tablespoons snipped fresh dill
Sour cream (optional)
Directions:
- For noodles, bring salted water to a boil in a 4-quart pan. Cut green beans diagonally into 2-inch pieces. Set aside.
- Lightly spray a 12-inch skillet with vegetable oil; heat over medium-high heat 1-3 minutes or until hot. Meanwhile, dice chicken into 1-inch pieces; sprinkle with paprika, salt, black pepper and cayenne pepper, if desired. Cook 5-7 minutes or until centers of chicken are no longer pink, stirring occasionally. Remove chicken from skillet; set aside.
- As chicken cooks, cut mushrooms into quarters. Cut onion in half lengthwise; then into -inch wedges. Add 1 tablespoon of the butter to skillet. Cook and stir mushrooms and onion over medium-high heat 5 minutes or until golden brown.
- Meanwhile, add noodles to boiling water and cook 2 minutes. Add green beans to noodles. Cook, uncovered, 5 to 6 minutes or until noodles are cooked to desired tenderness. Carefully remove ¾ cup of the cooking water for use in sauce. Drain noodles and green beans using large colander.
- Add chicken and cooking water to skillet; stir to loosen browned bits from bottom of skillet. Cook and stir 2 to 3 minutes or until sauce is thickened and chicken is heated through.
- Meanwhile, toss noodles and green beans with remaining butter. Snip or chop dill.
- To serve: Divide noodle mixture among serving plates; top with chicken and sauce. Sprinkle with dill and garnish with sour cream, if desired.
Serves four.
Nutrition values per serving: 500 calories, 20 g fat (8 g saturated), 49 g carbohydrates, 5 g fiber, 31 g protein, 150 mg cholesterol, 380 mg sodium.
Review: Well, not my favorite chicken recipe, but it was good. It was definitely something different and may just be the way I cooked it, so I might try again just to see if I change my mind. I used dried dill (didn't have fresh) and light sour cream, which helps cut some of the calories. I also don't think I used the butter to also cut calories and use yolk-less egg noodles, which cuts down on the cholesterol. haha Maybe it's cutting down on all of these calories is why it wasn't as good as I hoped, but then again you can still have good tasting food without the calories. So try it, you might like it and if you aren't worried about the calories, go all out!
Weight Watchers Points: 11 points per serving
Another great thing about chicken is that Costco sells it in this HUGE 10lb. bag of Perdue chicken breasts in different sizes (but not as JUMBO as they seem to make them in the supermarket these days). Makes it very convenient as I don't have to bring them home, cut them up and freeze them and whenever I plan on making chicken for dinner, I just take 2 pieces out and defrost them.

Anyhow, I had a Pampered Chef party several months ago and bought their cookbook called "29 minutes to dinner." There were 2 main reasons I decided to buy this cookbook, maybe three. 1) It has pictures. A cookbook with pictures is always a big plus for me. I am a very visual person and pictures just helps spark the creative juices flowing. 2) The P.C. consultant actually had a list of the Weight Watchers points per recipe, which was a HUGE plus! 3. It's small, won't take up too much room on my shelf! =) Oh yeah, and did I mention it's only supposed to take 29 minutes to the meal?! So make that 4 reasons! When I come home from work the last thing I want is to make a meal that takes an hour. Anyhow, I thumbed through the book and found a recipe that had both chicken (September recipe theme) and pasta (October recipe theme). I figured it was a win-win, or was it?
Paprika Chicken and Egg Noodles
Ingredients:
8 ounces green beans

1 pound boneless, skinless chicken thighs
1 tablespoon paprika
½ teaspoon salt
¼ teaspoon coarsely ground black pepper
¼ teaspoon cayenne pepper (optional)
8 ounces mushrooms
1 medium onion
3 tablespoons butter, divided
8 ounces uncooked egg noodles
2 tablespoons snipped fresh dill
Sour cream (optional)
Directions:
- For noodles, bring salted water to a boil in a 4-quart pan. Cut green beans diagonally into 2-inch pieces. Set aside.
- Lightly spray a 12-inch skillet with vegetable oil; heat over medium-high heat 1-3 minutes or until hot. Meanwhile, dice chicken into 1-inch pieces; sprinkle with paprika, salt, black pepper and cayenne pepper, if desired. Cook 5-7 minutes or until centers of chicken are no longer pink, stirring occasionally. Remove chicken from skillet; set aside.
- As chicken cooks, cut mushrooms into quarters. Cut onion in half lengthwise; then into -inch wedges. Add 1 tablespoon of the butter to skillet. Cook and stir mushrooms and onion over medium-high heat 5 minutes or until golden brown.
- Meanwhile, add noodles to boiling water and cook 2 minutes. Add green beans to noodles. Cook, uncovered, 5 to 6 minutes or until noodles are cooked to desired tenderness. Carefully remove ¾ cup of the cooking water for use in sauce. Drain noodles and green beans using large colander.
- Add chicken and cooking water to skillet; stir to loosen browned bits from bottom of skillet. Cook and stir 2 to 3 minutes or until sauce is thickened and chicken is heated through.
- Meanwhile, toss noodles and green beans with remaining butter. Snip or chop dill.
- To serve: Divide noodle mixture among serving plates; top with chicken and sauce. Sprinkle with dill and garnish with sour cream, if desired.
Serves four.
Nutrition values per serving: 500 calories, 20 g fat (8 g saturated), 49 g carbohydrates, 5 g fiber, 31 g protein, 150 mg cholesterol, 380 mg sodium.
Review: Well, not my favorite chicken recipe, but it was good. It was definitely something different and may just be the way I cooked it, so I might try again just to see if I change my mind. I used dried dill (didn't have fresh) and light sour cream, which helps cut some of the calories. I also don't think I used the butter to also cut calories and use yolk-less egg noodles, which cuts down on the cholesterol. haha Maybe it's cutting down on all of these calories is why it wasn't as good as I hoped, but then again you can still have good tasting food without the calories. So try it, you might like it and if you aren't worried about the calories, go all out!
Weight Watchers Points: 11 points per serving
Daring Bakers Challenge: Shuna Fish Lydon's Caramel Cake
Like a lot of my fellow Daring Bakers I was excited to get back to something sweet. I was also very happy that it was a cake this month. Since this is/was my birthday month I thought it would be the perfect thing to make for my celebration.

Thank you to our DB hostess and helpers this month for a great selection they are the following: Dolores from Chronicles in Culinary Curiosity, Alex from Brownie of the Blondie and Brownie , Jenny of Foray into Food and helping them with the alternative baking side of things is once again Natalie of Gluten-a-Go-Go .
This month's recipe comes from Shuna Fish Lydon's website: http://blogs.kqed.org/bayareabites/2006%20…%20he-recipe/
CARAMEL CAKE WITH CARAMELIZED BUTTER FROSTING
Author: Shuna Fish Lydon
10 Tablespoons unsalted butter at room temperature
1 1/4 Cups granulated sugar
1/2 teaspoon kosher salt
1/3 Cup Caramel Syrup (see recipe below)
2 each eggs, at room temperature
splash vanilla extract
2 Cups all-purpose flour
1/2 teaspoon baking powder
1 cup milk, at room temperature
Author: Shuna Fish Lydon
10 Tablespoons unsalted butter at room temperature
1 1/4 Cups granulated sugar
1/2 teaspoon kosher salt
1/3 Cup Caramel Syrup (see recipe below)
2 each eggs, at room temperature
splash vanilla extract
2 Cups all-purpose flour
1/2 teaspoon baking powder
1 cup milk, at room temperature
Preheat oven to 350F
Butter one tall (2 – 2.5 inch deep) 9-inch cake pan. In the bowl of a stand mixer fitted with a paddle attachment, cream butter until smooth. Add sugar and salt & cream until light and fluffy.
Slowly pour room temperature caramel syrup into bowl. Scrape down bowl and increase speed. Add eggs/vanilla extract a little at a time, mixing well after each addition. Scrape down bowl again, beat mixture until light and uniform.
Sift flour and baking powder.Turn mixer to lowest speed, and add one third of the dry ingredients. When incorporated, add half of the milk, a little at a time. Add another third of the dry ingredients, then the other half of the milk and finish with the dry ingredients. {This is called the dry, wet, dry, wet, dry method in cake making. It is often employed when there is a high proportion of liquid in the batter.}
Take off mixer and by hand, use a spatula to do a few last folds, making sure batter is uniform. Turn batter into prepared cake pan.
Place cake pan on cookie sheet or 1/2 sheet pan. Set first timer for 30 minutes, rotate pan and set timer for another 15-20 minutes. Your own oven will set the pace. Bake until sides pull away from the pan and skewer inserted in middle comes out clean. Cool cake completely before icing it.
Cake will keep for three days outside of the refrigerator.

CARAMEL SYRUP
2 cups sugar
1/2 cup water
1 cup water (for "stopping" the caramelization process)
In a small stainless steel saucepan, with tall sides, mix water and sugar until mixture feels like wet sand. Brush down any stray sugar crystals with wet pastry brush. Turn on heat to highest flame. Cook until smoking slightly: dark amber.
When color is achieved, very carefully pour in one cup of water. Caramel will jump and sputter about! It is very dangerous, so have long sleeves on and be prepared to step back.
Whisk over medium heat until it has reduced slightly and feels sticky between two fingers. {Obviously wait for it to cool on a spoon before touching it.}
Note: For safety reasons, have ready a bowl of ice water to plunge your hands into if any caramel should land on your skin.
(recipes above courtesy of Shuna Fish Lydon)
Butter one tall (2 – 2.5 inch deep) 9-inch cake pan. In the bowl of a stand mixer fitted with a paddle attachment, cream butter until smooth. Add sugar and salt & cream until light and fluffy.
Slowly pour room temperature caramel syrup into bowl. Scrape down bowl and increase speed. Add eggs/vanilla extract a little at a time, mixing well after each addition. Scrape down bowl again, beat mixture until light and uniform.
Sift flour and baking powder.Turn mixer to lowest speed, and add one third of the dry ingredients. When incorporated, add half of the milk, a little at a time. Add another third of the dry ingredients, then the other half of the milk and finish with the dry ingredients. {This is called the dry, wet, dry, wet, dry method in cake making. It is often employed when there is a high proportion of liquid in the batter.}
Take off mixer and by hand, use a spatula to do a few last folds, making sure batter is uniform. Turn batter into prepared cake pan.
Place cake pan on cookie sheet or 1/2 sheet pan. Set first timer for 30 minutes, rotate pan and set timer for another 15-20 minutes. Your own oven will set the pace. Bake until sides pull away from the pan and skewer inserted in middle comes out clean. Cool cake completely before icing it.
Cake will keep for three days outside of the refrigerator.
CARAMEL SYRUP
2 cups sugar
1/2 cup water
1 cup water (for "stopping" the caramelization process)
In a small stainless steel saucepan, with tall sides, mix water and sugar until mixture feels like wet sand. Brush down any stray sugar crystals with wet pastry brush. Turn on heat to highest flame. Cook until smoking slightly: dark amber.
When color is achieved, very carefully pour in one cup of water. Caramel will jump and sputter about! It is very dangerous, so have long sleeves on and be prepared to step back.
Whisk over medium heat until it has reduced slightly and feels sticky between two fingers. {Obviously wait for it to cool on a spoon before touching it.}
Note: For safety reasons, have ready a bowl of ice water to plunge your hands into if any caramel should land on your skin.
(recipes above courtesy of Shuna Fish Lydon)
Review: I made this cake for my birthday and thought it came out great. The cake part itself was very straight forward and I did not have any problems with it. The cake to me was dense but really tasty. The caramel gave it a nice flavor that was unique and very pleasant.
The part I really enjoyed and loved was the caramel syrup. I think I could have cooked it a little bit longer but I was afraid of burning it. It taste SOOOOO good and I would make it again in a heartbeat. I used it as a sweetener for my coffee and even got other family members to do the same. It kept very well in the refrigerator for several weeks before we finished it.
The part I didn't really like was the brown butter buttercream (which is why I didn't include the recipe above). I have decided that I am not a fan of homemade buttercream and unless it is required I don't think I will make them again. My husband doesn't really care for them as well and it is sort of wasted on us.
Friday, November 21, 2008
KAF Soft Molasses Cookies
For a while now I have been wanted to make some kind of molasses cookies. One reason was because my husband requested them. Another reason was because I bought a jar of molasses thinking I didn't have any in the house...to only find out that I had a jar at least 3/4 full. So I figured this would be a good way to use up some of that molasses. I was also thinking about making a gingerbread house this year for the holidays but with an almost 3 year old boy in the house...it isn't going to happen.
I actually had this recipe bookmarked for a while now but what made me decide to make it was that it was today's post on the King Arthur Flour blog...Bakers' Banter. I was also having company over on Monday for brunch and though this would make a great addition to my other desserts.


Review: This is an easy to make cookie recipe in every way. I also think by using a cookie scoop it makes it all that much easier. I rolled mine in a combination of sugars...course sugar, granulated sugar, both course and granulated and none at all. By far to me the course sugar wins it because it adds a nice crunch to this cookie.
Subscribe to:
Posts (Atom)
LinkWithin
