I saw this on a post about a month ago and it has been in my mind ever since...Campfire Orange Cakes! I just thought this would be something fun to do while we sit around the fire pit with the neighbors. If anything it would be a conversation piece and a bonus of eating yummy cake at the end. I did not take any pictures of my process because if you go over to ljcfyi's blog she has detailed pictures. Also I prepared them ahead of time and was in a rush to get other stuff done.
I did find a little trick (of course at the end) on how to scoop out the insides. It is sort of hard to explain but you basically try to get your finger in between the skin and the "meat"....I will have to take pictures the next time I do this.
Review: I found this to be a fun idea and I think everyone enjoyed it as well. I think the hardest and most time consuming part of this recipe is taking the "meat" out of the oranges. I only bought 4 oranges and had probably enough cake batter left for at least 4 more oranges. I think the reason for that is I couldn't find those huge oranges that you sometimes find out there. I now find myself thinking about what else I could use in place but so far the only thing I thought of is a grapefruit. I think my next campfire cooking adventure might be the banana boats.
Tuesday, August 31, 2010

Monday, August 23, 2010
Brownie Mosaic Cheesecake
This always happens to me...I am searching for a recipe (this time it was for an Oreo type cookie) and come across at least a few others I want to try. I file them into my folder of recipes I want to try and usually don't get to them. This time I was determined not to let that happen again because I found a recipe that made my heart jump a couple of beats....
Brownie Mosaic Cheesecake.
You have to check out the page on where I found it because it has really nice pictures and the full recipe there. I took a couple of pictures of my cheesecake just out of the oven and once I put the ganache onto it.

Brownie Mosaic Cheesecake.
You have to check out the page on where I found it because it has really nice pictures and the full recipe there. I took a couple of pictures of my cheesecake just out of the oven and once I put the ganache onto it.
Just out of the oven

With the ganache onto....yummy!

Review: For the most part this was an easy recipe to make but it is just time consuming because of all the part. I made the brownie part of it Thursday night and put it in the refrigerator. Friday I made the rest of the cheesecake parts. No part was really that complicated in fact my neighbor told me the brownies were the best brownies she ever had (Baker's One Bowl Brownie)...I brought over the extras for our Friday night get together. I don't think there is anything I would do different because it tasted really good as is and I think everyone at the party liked it. The ganache part was perfect because as you can see from my out of the oven picture I got a few cracks that those were covered right up by the ganache. The ganache recipe also makes just the perfect amount to go on top. Heidi wants me to make it bring to my Mom's house for the holidays coming up...so I think this one is a keeper!
Friday, August 20, 2010
The Next Day
I just found a better picture of the Zeppole dessert on my camera that I took while eating them for breakfast with a nice cup of coffee....


Monday, August 16, 2010
Restaurant Review: Amici's in Poughkeepsie
Mike and I celebrated our 9 year wedding anniversary last week. We were lucky enough to have my in-laws watch the kids so we can go out for a nice dinner. We live in the Hudson Valley area which has a lot wonderful restaurants to try out. It is really hard to top last years celebration of lunch at the CIA and a winery visit.
So I asked my neighbor for suggestions. She first asked me if I liked olives (YES) and then told me about an appetizer the restaurants has...to be honest I was already sold on going there for dinner. Then she told me about a dessert they have...cannoli creamed filled zeppoles...OK if I wasn't sold before I was definitely sold now.
Amici's Restaurant
For appetizer we had:
Fried Gorgonzola Stuffed Olives with Vermouth Aioli* Queen olives stuffed with creamy gorgonzola, rolled in fresh bread crumbs and lightly fried

Flash Fried Calamari with Two Sauces Fresh squid, dusted and fried, served with spicy marinara and creamy garlic horseradish dip
For Entrees we had:
Pork Shank “Osso Bucco” Slow cooked and matched with Ricotta Polenta and seasonal vegetables with red wine braising sauce.
I had a special called Unwrapped scallops with bacon that was served with pencil thin asparagus.
For Dessert we shared a plate full of Cannoli Cream stuffed Zeppoles. They were NOT on the menu but I had to ask about them since they were one of the reason we picked this place. The waitress talked to the chef and he said he would make them.

Review: I am in love with this place now because the food was SO good and the location is awesome. It is just about two blocks from the Hudson River which was nice for a pre-meal walk. We tried a new bottle of wine (totally forget the name) which was super yummy! The olive appetizer was hands down one of the best things I have ever eaten in my life...then came dessert and Mike said that was THE best dessert he has ever had in his life. It was really to die for and I can't get it out of my mind. I need to lose about 15 lbs before I can go back there and have it again!
So I asked my neighbor for suggestions. She first asked me if I liked olives (YES) and then told me about an appetizer the restaurants has...to be honest I was already sold on going there for dinner. Then she told me about a dessert they have...cannoli creamed filled zeppoles...OK if I wasn't sold before I was definitely sold now.
Amici's Restaurant
For appetizer we had:
Fried Gorgonzola Stuffed Olives with Vermouth Aioli* Queen olives stuffed with creamy gorgonzola, rolled in fresh bread crumbs and lightly fried

Flash Fried Calamari with Two Sauces Fresh squid, dusted and fried, served with spicy marinara and creamy garlic horseradish dip
For Entrees we had:
Pork Shank “Osso Bucco” Slow cooked and matched with Ricotta Polenta and seasonal vegetables with red wine braising sauce.
I had a special called Unwrapped scallops with bacon that was served with pencil thin asparagus.
For Dessert we shared a plate full of Cannoli Cream stuffed Zeppoles. They were NOT on the menu but I had to ask about them since they were one of the reason we picked this place. The waitress talked to the chef and he said he would make them.
(The best picture I could get)

Review: I am in love with this place now because the food was SO good and the location is awesome. It is just about two blocks from the Hudson River which was nice for a pre-meal walk. We tried a new bottle of wine (totally forget the name) which was super yummy! The olive appetizer was hands down one of the best things I have ever eaten in my life...then came dessert and Mike said that was THE best dessert he has ever had in his life. It was really to die for and I can't get it out of my mind. I need to lose about 15 lbs before I can go back there and have it again!
Tuesday, August 10, 2010
Friday Night Cocktails and Fire Pit!
So this summer we have started a little thing called Friday Night Cocktail night with our neighbors. We get the fire pit going and start pouring the drinks.

This last Friday Nights featured drink were Pomegranate Margaritas using the POM Wonderful juice I received.
Pomegranate Margaritas
1 3/4 cups chilled Pomegranate juice
Kosher salt
1 1/2 cups silver Tequila
1 cup Triple Sec
2/3 cup fresh lime juice
Ice cubes
8 lime wedges, for garnish
Review: OH MY wow this drink really knocks you on your butt...in a good way of course. It was super yummy and something I would make again. I did not use the salt because we drink out of plastic cups and there was no need to be fancy. I also used Cointreau instead of the triple sec because that is what I had in the house. It is a strong drink but I don't think I used enough ice and just realized that 3 of us drank it when it serves 8. Lets just say that we all had a really good time...
Pine! Pine! Pine!

This last Friday Nights featured drink were Pomegranate Margaritas using the POM Wonderful juice I received.
Pomegranate Margaritas
1 3/4 cups chilled Pomegranate juice
Kosher salt
1 1/2 cups silver Tequila
1 cup Triple Sec
2/3 cup fresh lime juice
Ice cubes
8 lime wedges, for garnish
Directions:
Pour 1/4 cup of pomegranate juice in a saucer and dip rims of glasses. Then dip moistened rims of glasses in kosher salt. Stir the remaining 1 ½ cups of pomegranate juice, the tequila, triple sec and lime juice. Working in batches, shake the mixture in a large ice-filled shaker, then strain into the glasses. Garnish each margarita with a lime.
Review: OH MY wow this drink really knocks you on your butt...in a good way of course. It was super yummy and something I would make again. I did not use the salt because we drink out of plastic cups and there was no need to be fancy. I also used Cointreau instead of the triple sec because that is what I had in the house. It is a strong drink but I don't think I used enough ice and just realized that 3 of us drank it when it serves 8. Lets just say that we all had a really good time...
Pine! Pine! Pine!
Thursday, August 5, 2010
POM Wonderful
I was contacted by someone at POM Wonderful to see if I was interested in trying out some of their product. So of course my answer was YES!!! I mean who wouldn't want something for free and who wouldn't want something yummy like pomegranate juice. Let me tell you the ideas have just been flowing...
So I waited patiently (only about a week) for my case to arrive.

Since I received a case of 8 x 8oz bottles I am going to try and do at least a few different things with it. So of course that night with dinner we all shared a bottle of just straight up POM juice. I have always seen the bottle in the supermarket but never really thought about buying it before. For some odd reason I thought it would taste different from what you taste when you eat a fresh pomegranate but it did not.
Mike was making fun of me because he wanted to know why it was called POM Wonderful. Thank you to the internet and company websites I was able to just look it on and let him know:
The "Wonderful" actually refers to the variety of pomegranates we grow in our California orchards. All of the fresh pomegranates we sell are of the Wonderful variety as is the juice we press at our own facility.
Taken from POM Wonderful … More Than Just a Name article.
My Review: The juice it super yummy and taste really fresh to me. It is on the tart side and reminds me of cranberry juice. I have to say I love the shape of the bottles which I know has nothing to do with the taste but makes me happy.
Check back soon for some recipe I try out using POM Wonderful juice!
So I waited patiently (only about a week) for my case to arrive.

Since I received a case of 8 x 8oz bottles I am going to try and do at least a few different things with it. So of course that night with dinner we all shared a bottle of just straight up POM juice. I have always seen the bottle in the supermarket but never really thought about buying it before. For some odd reason I thought it would taste different from what you taste when you eat a fresh pomegranate but it did not.
Mike was making fun of me because he wanted to know why it was called POM Wonderful. Thank you to the internet and company websites I was able to just look it on and let him know:
The "Wonderful" actually refers to the variety of pomegranates we grow in our California orchards. All of the fresh pomegranates we sell are of the Wonderful variety as is the juice we press at our own facility.
Taken from POM Wonderful … More Than Just a Name article.
My Review: The juice it super yummy and taste really fresh to me. It is on the tart side and reminds me of cranberry juice. I have to say I love the shape of the bottles which I know has nothing to do with the taste but makes me happy.
Check back soon for some recipe I try out using POM Wonderful juice!
Wednesday, August 4, 2010
Empty Jars...Pet Peeve!
One of my pet peeves is when I go into the refrigerator and I found an empty jar. This picture make it look like there is more peanut butter in there then there really was...


Thursday, July 29, 2010
Tres Leches Cake
We had our 2nd annual family bbq/baseball game a couple of weeks ago which was a lot of fun. It was just after my sister-in-law's birthday...so of course I had to make her a birthday cake. She really isn't the traditional type and I had to come up with something special for her.
Then it hit me in the car driving some where...Tres Leches Cake. In May we went to see her graduate from Grad school and she took us to a place that served Tres Leches cake which she said she really loved. I know there is a bakery near me that supposedly makes a really good one but I wanted to try making it myself.
I did not get a picture of what I made because my camera and because it was gone in minutes. I am always looking for an excuse to make something from The Pioneer Woman's website...there you can see step by step pictures with instructions on how to make this super yummy cake!

Tres Leches Cake
The Pioneer Woman
1 cup All-purpose Flour
1-½ teaspoon Baking Powder
¼ teaspoons Salt
5 whole Eggs
1 cup Sugar, Divided
1 teaspoon Vanilla
⅓ cups Milk
1 can Evaporated Milk
1 can Sweetened, Condensed Milk
¼ cups Heavy Cream
FOR THE ICING:
1 pint Heavy Cream, For Whipping
3 Tablespoons Sugar
Preheat oven to 350 degrees. Spray a 9 x 13 inch pan liberally until coated.
Then it hit me in the car driving some where...Tres Leches Cake. In May we went to see her graduate from Grad school and she took us to a place that served Tres Leches cake which she said she really loved. I know there is a bakery near me that supposedly makes a really good one but I wanted to try making it myself.
I did not get a picture of what I made because my camera and because it was gone in minutes. I am always looking for an excuse to make something from The Pioneer Woman's website...there you can see step by step pictures with instructions on how to make this super yummy cake!
(This is not my picture)

Tres Leches Cake
The Pioneer Woman
1 cup All-purpose Flour
1-½ teaspoon Baking Powder
¼ teaspoons Salt
5 whole Eggs
1 cup Sugar, Divided
1 teaspoon Vanilla
⅓ cups Milk
1 can Evaporated Milk
1 can Sweetened, Condensed Milk
¼ cups Heavy Cream
FOR THE ICING:
1 pint Heavy Cream, For Whipping
3 Tablespoons Sugar
Preheat oven to 350 degrees. Spray a 9 x 13 inch pan liberally until coated.
Combine flour, baking powder, and salt in a large bowl. Separate eggs.
Beat egg yolks with 3/4 cup sugar on high speed until yolks are pale yellow. Stir in milk and vanilla. Pour egg yolk mixture over the flour mixture and stir very gently until combined.
Beat egg whites on high speed until soft peaks form. With the mixer on, pour in remaining 1/4 cup sugar and beat until egg whites are stiff but not dry.
Fold egg white mixture into the batter very gently until just combined. Pour into prepared pan and spread to even out the surface.
Bake for 35 to 45 minutes or until a toothpick comes out clean. Turn cake out onto a rimmed platter and allow to cool.
Combine condensed milk, evaporated milk, and heavy cream in a small pitcher. When cake is cool, pierce the surface with a fork several times. Slowly drizzle all but about 1 cup of the milk mixture—try to get as much around the edges of the cake as you can.
Allow the cake to absorb the milk mixture for 30 minutes. To ice the cake, whip 1 pint heavy cream with 3 tablespoons of sugar until thick and spreadable.
Spread over the surface of the cake. Decorate cake with whole or chopped maraschino cherries. Cut into squares and serve.
Wednesday, July 28, 2010
May The Force Be With You...
I am one of those people when I get a gift card it either takes me a minute to spend it all or forever to spend it all. Ok the taking forever to spend really doesn't happen to me that often but every once in a while it does. I got one from Williams-Sonoma two years ago and I just finished this week. I guess I was just waiting to see if there was anything I really wanted before I spent it on another spatula. Then I saw the Star Wars cookie cutters that are exclusively William - Sonoma...just what I was waiting for.
My 4 year old is all about Star Wars...the movies, the games, the toys and even the clothes. So when I showed this to him that was it...his eyes got huge and I know I had to get it. The next morning he was already asking for Darth Vader cookies.
I made the recipe that came with the cookie cutters because I figured it would give me a good idea of the dough that would work best with the cutters.

Star Wars Cookies
Williams-Sonoma
2 1/2 cups (390 g)All-Purpose Flour
1/2 tsp salt
12 Tbs (1 1/2 sticks/185g) Unsalted Butter
1 cup (250 g) Sugar
1 Egg
1 1/2 tsp Vanilla Extract
Have all the ingredients at room temperature.
Over a small bowl, sift together the flour and salt. Set aside.
In the bowl of an electric mixer fitted with the flat beater, beat the butter on hight speed until creamy, about 2 minutes. Reduce the speed to medium, slowly add the sugar and beat until light and fluffy, about 2 minutes, stopping the mixter occasionally to scrape down the sides of the bowl. Add the egg and vanilla and beat for 1 minute, stopping once to scrape down the sides of the bowl.
Stop the mixer and add half of the flour mixture. Beat on low speed until most of the flour has been absorbed, about 1 minute. Add the remaining flour and continue beating until all the flour has been absorbed and the dough starts to pull away from the sides of the bowl, 2 to 3 minutes.
Turn the dough out onto a work surface and divide into 2 equal balls. Shape each into a disk and wrap separately in plastic wrap. Refrigerate for at least 2 hours or up to 2 days.
Remove the dough from the refrigerator and let stand for 5 minutes. On a lightly floured surface, roll out the dough 3/16 to 1/4 inch ( 4.5 to 6mm) thick.
Preheat an oven to 350. Line several baking sheets with parchment paper.
Using the cookie cutters, cut out the desired shapes. If the dough sticks to the cutter, dip the cutter into flour before cutting out more shapes. Using a small offset spatula, transfer the cookies to the prepared baking sheets, spacing them about 1 inch apart.
Bake the cookies until golden brown around the edges, 10 to 15 minutes. If baking more than one sheet at a time, rotate the baking sheets from top to bottom and 180 degrees halfway through baking.
Transfer the baking sheets to wire racks and let cool for 5 minutes, then transfer the cookies to the racks and let cool completely. Decorate as desired. Store the cookies in an airtight container at room temperature for up to 3 days. Makes about 8 of each cookie.
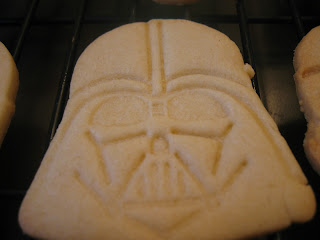

Review: I have another recipe for rolled cookies which I haven't made in really long time but this one I think is a keeper as well. It was nice to work with and has a great taste. Next time I might try to use some almond extract instead of or a combo of both vanilla and almond.
I have been following another blog called University of Cookie because it is one of my goals to make cookies like the ones on that blog. Well there is a post on there called Rolling Cookie Dough: a video tutorial. I watched it a couple of times and did what she said...and it worked for me!! The one thing I hated most about making cut out cookies was the rolling out of the dough because mine always cracked and just didn't work well for me. Well no more because of that post and I am actually excited to make more.
One idea I am throwing around is making sandwiches with the Star Wars cookie cutters...chocolate/vanilla middle for Darth (my husband thinks that is fitting since he was good on the instead which is what the vanilla would represent), I think a minty green flavor combo for Yoda and not sure about the other two but I am sure I can come up with something.
My 4 year old is all about Star Wars...the movies, the games, the toys and even the clothes. So when I showed this to him that was it...his eyes got huge and I know I had to get it. The next morning he was already asking for Darth Vader cookies.
I made the recipe that came with the cookie cutters because I figured it would give me a good idea of the dough that would work best with the cutters.

Star Wars Cookies
Williams-Sonoma
2 1/2 cups (390 g)All-Purpose Flour
1/2 tsp salt
12 Tbs (1 1/2 sticks/185g) Unsalted Butter
1 cup (250 g) Sugar
1 Egg
1 1/2 tsp Vanilla Extract
Have all the ingredients at room temperature.
Over a small bowl, sift together the flour and salt. Set aside.
In the bowl of an electric mixer fitted with the flat beater, beat the butter on hight speed until creamy, about 2 minutes. Reduce the speed to medium, slowly add the sugar and beat until light and fluffy, about 2 minutes, stopping the mixter occasionally to scrape down the sides of the bowl. Add the egg and vanilla and beat for 1 minute, stopping once to scrape down the sides of the bowl.
Stop the mixer and add half of the flour mixture. Beat on low speed until most of the flour has been absorbed, about 1 minute. Add the remaining flour and continue beating until all the flour has been absorbed and the dough starts to pull away from the sides of the bowl, 2 to 3 minutes.
Turn the dough out onto a work surface and divide into 2 equal balls. Shape each into a disk and wrap separately in plastic wrap. Refrigerate for at least 2 hours or up to 2 days.
Remove the dough from the refrigerator and let stand for 5 minutes. On a lightly floured surface, roll out the dough 3/16 to 1/4 inch ( 4.5 to 6mm) thick.
Preheat an oven to 350. Line several baking sheets with parchment paper.
Using the cookie cutters, cut out the desired shapes. If the dough sticks to the cutter, dip the cutter into flour before cutting out more shapes. Using a small offset spatula, transfer the cookies to the prepared baking sheets, spacing them about 1 inch apart.
Bake the cookies until golden brown around the edges, 10 to 15 minutes. If baking more than one sheet at a time, rotate the baking sheets from top to bottom and 180 degrees halfway through baking.
Transfer the baking sheets to wire racks and let cool for 5 minutes, then transfer the cookies to the racks and let cool completely. Decorate as desired. Store the cookies in an airtight container at room temperature for up to 3 days. Makes about 8 of each cookie.


Review: I have another recipe for rolled cookies which I haven't made in really long time but this one I think is a keeper as well. It was nice to work with and has a great taste. Next time I might try to use some almond extract instead of or a combo of both vanilla and almond.
I have been following another blog called University of Cookie because it is one of my goals to make cookies like the ones on that blog. Well there is a post on there called Rolling Cookie Dough: a video tutorial. I watched it a couple of times and did what she said...and it worked for me!! The one thing I hated most about making cut out cookies was the rolling out of the dough because mine always cracked and just didn't work well for me. Well no more because of that post and I am actually excited to make more.
One idea I am throwing around is making sandwiches with the Star Wars cookie cutters...chocolate/vanilla middle for Darth (my husband thinks that is fitting since he was good on the instead which is what the vanilla would represent), I think a minty green flavor combo for Yoda and not sure about the other two but I am sure I can come up with something.
Tuesday, July 27, 2010
I Am Back
I know it has been a very long time since my last post and that is for a couple of reasons. One as I mentioned before my camera is on it's way out so I haven't been taking many pictures. The other reason I have been sort of out of the kitchen. It has been so hot around here lately that the thought of cooking makes me sweat. I have come to terms with both and decided it is time to get back into the kitchen and create some wonderful stuff.
A preview to what is coming up next:

A preview to what is coming up next:

Subscribe to:
Posts (Atom)
LinkWithin
