Monday, November 29, 2010

Pecan Tassies

I was asked to bring a dessert to my cousin's house for Thanksgiving this year. I wanted to do something that was a twist (sort of) on Pecan Pie but wasn't as big as a whole pie. My family loves dessert so I knew that there would be a ton and this recipe would give a little taste...

Pecan Tassie
allrecipes.com

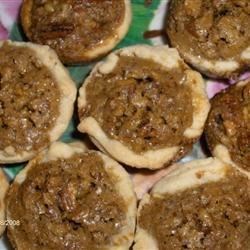
(not my picture I got it from allrecipes.com)


2 cups margarine
4 (3 ounce) packages cream cheese
4 cups all-purpose flour
3 eggs
2 1/2 cups packed brown sugar
3 tablespoons melted butter
1/2 teaspoon vanilla extract
1 pinch salt
1 1/2 cups chopped pecans

Directions:

1. Preheat the oven to 350 degrees F (175 degrees C).

2. In a medium bowl, mix together the margarine and cream cheese until well blended. Beat in flour, 1 cup at a time, until the mixture forms a smooth dough. Roll into small balls, and press into the bottoms and sides of tart pans or mini muffin pans.

3. In another bowl, mix together the eggs, brown sugar, butter, vanilla, and salt. Stir in the pecans. Use a spoon to fill each of the crusts 2/3 full with the filling mixture.

4. Bake for 15 to 18 minutes in the preheated oven, until shell is light brown, and the filling has puffed up. Cool, and carefully remove from pans.


Review: I decided to cut the recipe in half because it yields 5 dozen and I really didn't need to bring that many with me and I also only had one mini muffin tin. I highly suggest If you make this recipe having more then one because it takes forever otherwise. I thought they came out great and looked to me like mini pecan pies which is what I was going for....so I am happy :)

Dinner Week of 11/28 - 12/4

This week might be light on meals since we are all under the weather...

Sunday - Thanksgiving leftover sandwiches
Monday - Wanton Soup
Tuesday - nothing (sick)
Wednesday - Chicken Noodle Soup
Thursday - Mike made pasta (I was sick again)
Friday - Pizza
Saturday - Tacos

Sunday, November 28, 2010

Dinner Week of 11/21 - 11/27

This is going to be a light week on cooking with the Thanksgiving...not that I am complaining.

Sunday - Baked Ziti with a salad
Monday - Steak and potatoes
Tuesday - Chili and rice
Wednesday - Pizza
Turkey Day - Turkey and all the extra stuff with my side of the family
Friday - Hamburgers and chips
Saturday - Second turkey dinner with my in-laws

Saturday, November 20, 2010

Dinner Week of 11/14 - 11/20

This is what we had for dinner this past week:

Sunday - Ate at Ma & Pa's house
Monday - Tacos
Tuesday - Spaghetti and Meatballs
Wednesday - Leftovers (Split Peas Cuban style)
Thursday - Went out for Dinner
Friday - Pizza
Saturday - Went out for dinner

Wednesday, November 17, 2010

Toasted Marshmallow Milkshake

So I was catching up on some of the blogs I follow and came across the recipe for Toasted Marshmallow Milkshake. I was missing our campfire nights and thought that this might fill the void in a way. Also Jacob came home from school that day and they made milk shake that day. So he was all excited about making some at home.

Toasted Marshmallow Milkshake
joythebaker.com
adapted just slightly from Spike Mendelsohn’s recipe

makes two small or one large milkshake

8-10 large marshmallows
3 large scoops vanilla ice cream or a heaping 1-cup of vanilla ice cream
1/2 cup of milk
1/2 teaspoon vanilla extract

Place marshmallows on skewer and toast until slightly charred over a gas flame. If you don’t have skewers or a gas range, you can toast the marshmallows on a sheet tray in the broiler for 2 or 3 minutes. Keep an eye on the marshmallows as they’re in the oven. They’re liable to burst into marshmallow flames pretty quick. Place on a plate to cool slightly.

In a blender mix together ice cream, milk, vanilla extract and toasted marshmallows. Save one or two toasted marshmallows to top the milkshake(s). Blend well. For a thinner milkshake add more milk. If you’d like it a bit thicker… add more ice cream. Pour into glasses and top with toasted marshmallows. Enjoy on the quick.

Review: I did not use her method for toasting the marshmallows because Mike feared I would burn the house down. I put the marshmallows on a cookie sheet and put it under the broiler for a few minutes. I think this does a lot faster then doing 8-10 over a gas flame and the flavor came out the same...toasted. I liked the way the milkshake tasted but it was SUPER sweet and just a little goes a long way. I am not sure I would make this again just because it was so sweet but maybe next time try making it with chocolate ice cream...sort of like a s'more milkshake...just put a graham cracker garnish and there you go...

Blue M&M face

Thursday, November 11, 2010

Wednesday, November 10, 2010

Keeping Track of Meals....

I have a problem with meal planning...I do it for a couple of weeks and then I stop doing it. I get upset that I stopped and try to start again. I sometimes just have a hard time thinking ahead. What if I am not in the mood to eat what I planned...or what if I get lazy (or busy). So I think I am going to try and just keep track of what I make this month for dinner and maybe see if that helps me with future planning....

Last night I made:
Sloppy Joes


Monday, November 8, 2010

Margarita Cookies

We just celebrated my husband's grandparents 90th birthday this past weekend. Of course I took this opportunity to try out a recipe I have had on my list forever. I was also missing our Friday Night Fun nights a little bit and this recipe reminded me of it.

I got the recipe from
Smitten Kitchen which you should stop over and look at the step by step pictures. I have to say mine looked just like the pictures (for once) and since my camera is still on it's way out and I packaged up the cookie right away for the party I didn't get any.

Margarita Cookies
Adapted from Dorie Greenspan’s Sablés au Citron

Makes about 50 cookies

2 sticks (8 ounces; 230 grams) unsalted butter, at room temperature
2/3 cup (70 grams) confectioners’ sugar, sifted
2 large egg yolks, at room temperature
Pinch of salt
2 teaspoons tequila
Grated zest of 2 limes
Grate zest of half an orange
2 cups (280 grams) all-purpose flour

Coating:
Approximately 1/2 cup clear sanding or other coarse sugar
2 teaspoons flaky Maldon sea salt*

1. Put the butter in the bowl of a mixer fitted with the paddle attachment and beat at medium speed until it is smooth. Add the sifted confectioners’ sugar and beat again until the mixture is smooth and silky. Beat in 1 of the egg yolks, followed by the salt, tequila, grated lime and orange zest. Reduce the mixer speed to low and add the flour, beating just until it disappears. It is better to underbeat than overbeat at this point; if the flour isn’t fully incorporated, that’s ok–just blend in whatever remaining flour needs blending with a rubber spatula. Turn the dough out onto a counter, gather it into a ball, and divide it in half. Wrap each piece of dough in plastic wrap and refrigerate for about 30 minutes.

2. Working on a smooth surface, form each piece of dough into a log that is about 1 to 1 1/4 inches (2.5 to 3.2 cm) thick. (Get the thickness right, and the length you end up with will be fine.) Wrap the logs in plastic and chill for 2 hours. (The dough can be wrapped airtight and kept refrigerated for up to 3 days or stored in the freezer for up to 1 month.)

3. Position the racks to divide the oven into thirds and preheat the oven to 350°F (180°C). Line two baking sheets with parchment paper.

4. While the oven is preheating, work on the sugar coating: Whisk the remaining egg yolk in a small bowl until it is smooth and liquid enough to use as a glaze. Mix the coarse sugar and flaky salt well and spread the mixture out on a piece of wax paper. Remove the logs of dough from the refrigerator, unwrap them, and brush them lightly with a little egg yolk. Roll the logs in the sugar, pressing the sugar/salt mixture gently to get it to stick if necessary, then, using a sharp slender knife, slice each log into cookies about 1/4 inch (7 mm) thick. [Deb note: To get the sugar/salt mixture to stick better, I moved the log over to a piece of plastic wrap, and in the sort of technique you'd see a sushi chef use to shape a roll, use the plastic to press the sugar in by wrapping it tightly.] (You can make the cookies thicker if you’d like; just bake them longer.) Place the cookies on the lined baking sheets, leaving about 1/2 inch (1.5 cm) space between them.

5. Bake the cookies for 12 to 14 minutes, or until they are set but not browned. (It’s fine if the yolk-brushed edges brown a smidgen.) Transfer the cookies to cooling racks to cool to room temperature.

Keeping: Packed airtight, the cookies will keep for about 5 days at room temperature. Because the sugar coating will melt, these cookies are not suitable for freezing.

* Updated to add that if you should choose to use regular table salt and not Maldon, use less! Much less. Probably half or less. Because Maldon has such volume, the equivalent amount of a finer salt would be much more pungent. Better on the safe side than sorry, right?


Review: Like I said in the post above I really have been missing our Friday night fun nights...and I was hoping this would cure that. I also have had this recipe on my list of things I want to make for a long time. Making the recipe was not bad at all...I did steps one and two one day and continued with the rest the next day. I used kosher salt on the outside and I think that added that real margarita feel to it to have the salty/sweet combo. Everyone at the party seemed to really enjoy the cookies and I think this one might be a keeper...


LinkWithin

Related Posts with Thumbnails